GENERAL GUIDELINES & SUGGESTED SETTINGS
This page provides detailed guidance on how to use our products, including recommended settings and key tips.
Note that the suggested settings are general guidelines, as differences in laser machines and metal grades can affect results.
To prevent potential issues, review the provided notes carefully. If you have any questions or need help with the test grid, feel free to contact us directly.
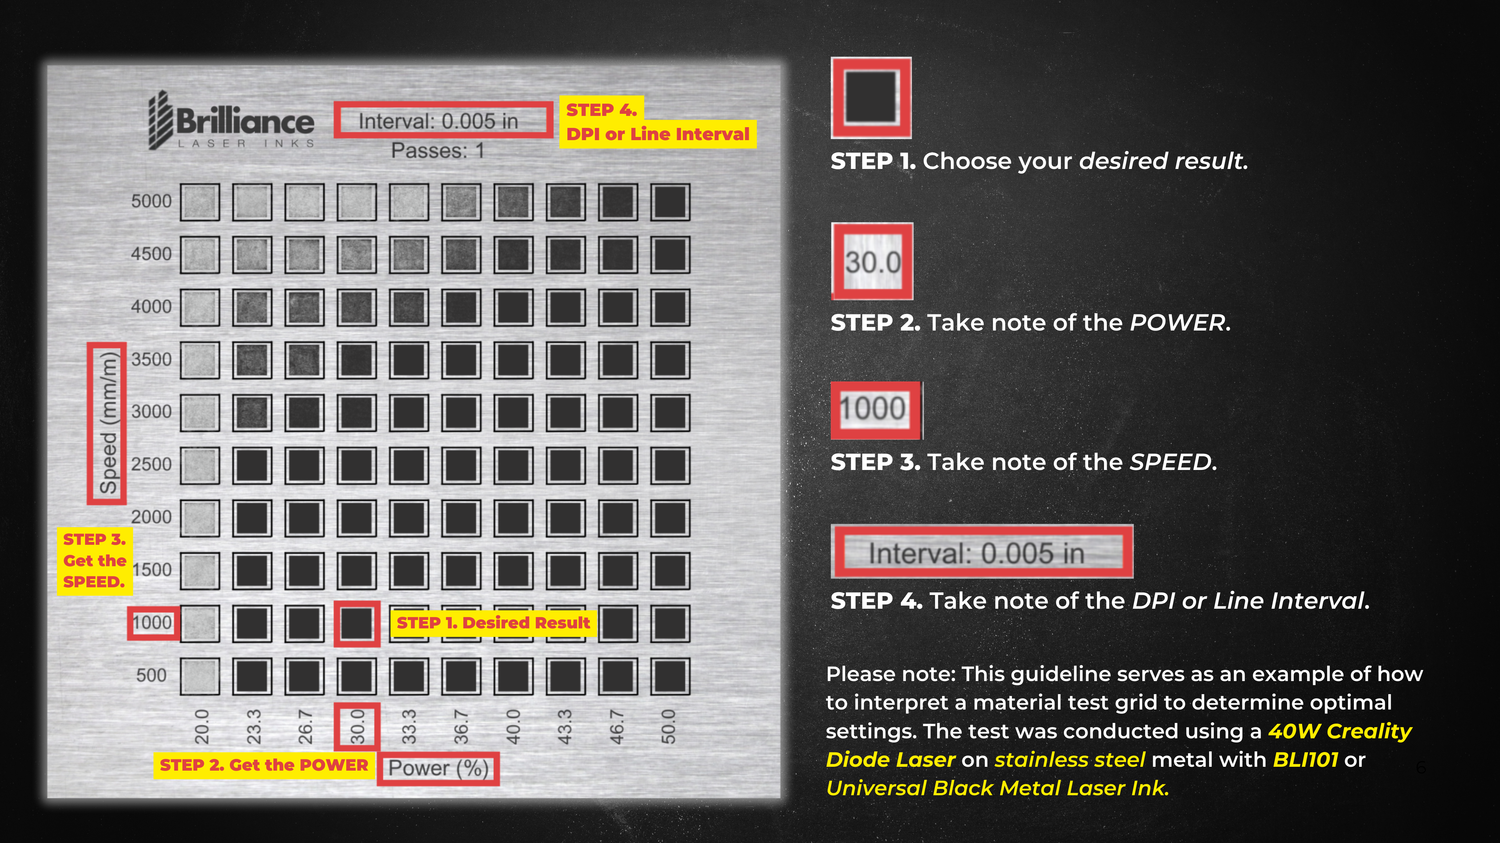
How to read a material test grid?
Read More About Material Test Grid
Read More About Material Test Grid
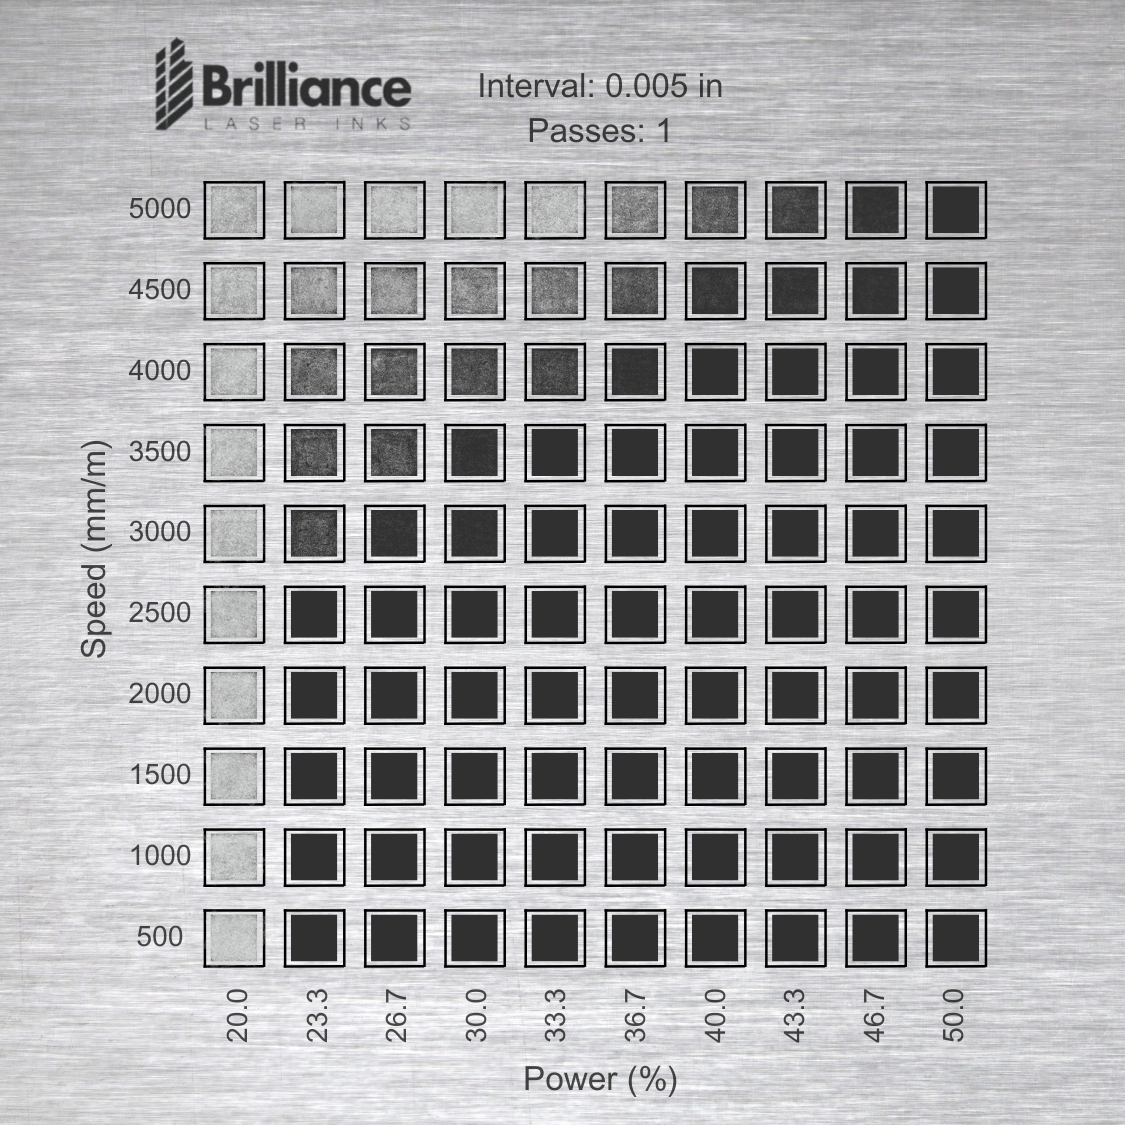
A material grid test is a systematic approach used to determine the optimal laser settings for marking, cutting, or engraving a specific material. This test is especially useful when working with different materials or when fine-tuning your settings for new projects. By creating a grid of various settings, you can visually compare how different combinations of speed, power, and frequency affect the outcome.
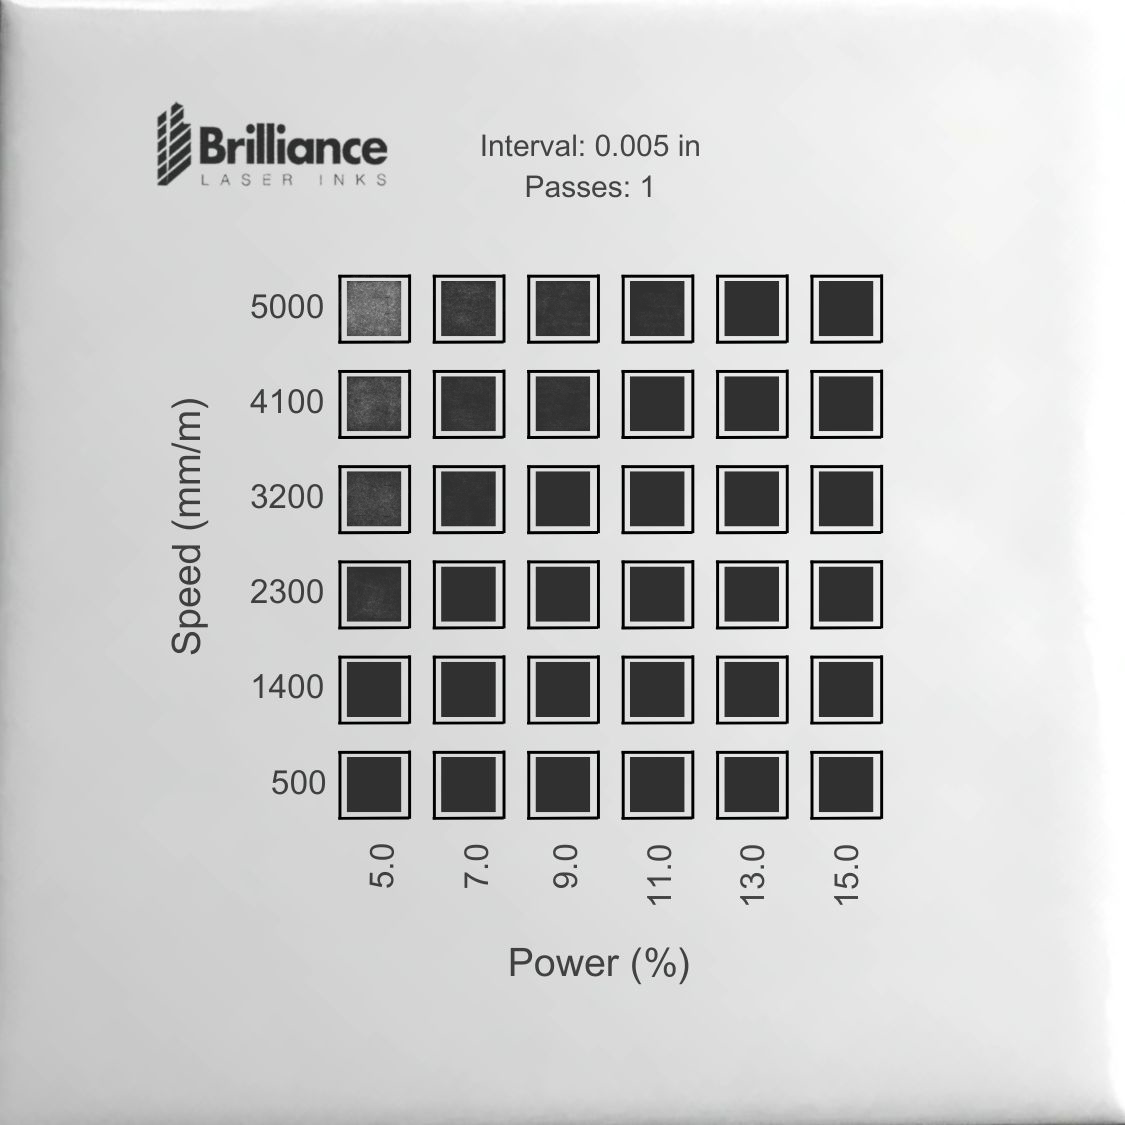
If you're working with stainless steel using a 40W Diode Laser, we recommend using BLI101 or Universal Black Metal Marking Ink.
To achieve optimal dark markings, refer to the Material Test Grid, which provides numerous suggestions.
The general recommended settings are as follows:
Power: 23.3% - 50%
Speed: 500 - 3500 mm/min
DPI (Line Interval): 0.005 in
Passes: 1
Important Notes:
- Results may vary based on the laser machine's wattage and the substrate's thickness.
- Thinner materials dissipate heat faster than thicker metals, which can affect engraving results. For thicker substrates, higher power and slower speeds may be required to achieve the desired outcome.
- Always test our products on a sample file before working on your final material to ensure the best possible results.
How to apply the Brilliance Laser Inks products?
Application process using Aerosols:
Application process using Aerosols:
Clean the Surface
- Start by cleaning the material surface with alcohol to remove any dirt or oils.
- Make sure the surface is completely dry before proceeding.
Apply the Spray
- Shake the bottle well before using to ensure all the contents are properly mixed.
- Hold the bottle at a 45° angle, about 6-8 inches away from the surface.
- Use a left-to-right motion to apply an even, thin coat for metals and thick coat for ceramics and glass. Apply just enough until the surface is no longer see-through.
- For Ceramics and Glass, thick coat is required.
Drying the laser inks
- Drying time varies by temperature and layer thickness.
- Speed up drying with a hot air gun or blow dryer.
- Ensure the entire layer (not just the top) is dry.
- Warm substrates can be laser marked and may improve results.
Start engraving:
- Adjust your laser settings based on the material you’re working with.
- Please check the general recommended settings by choosing the laser machine you are currently using.
Removing the residue:
- There’s no waiting time required! Once you're done lasering, rinse the surface under tap water or simply wipe it with a wet cloth. That’s it—enjoy your permanent, high-quality mark on your finished product!
Application process using powders:
Application process using powders:
Clean the Surface
- Start by cleaning the material surface with alcohol to remove any dirt or oils.
- Make sure the surface is completely dry before proceeding.
Mix the Powder with Denatured Alcohol or any Isopropyl Alcohol
- Mix denatured alcohol and powder at a 1:1 ratio by weight. For example, 10 grams of powder and 10 grams of alcohol make a 1:1 ratio.
- For bulk powders, please weigh the product in a separate beaker to create your desired ratio of powder and alcohol mixture.
Apply the prepared laser ink powder
- Using the brush, apply in a left-to-right motion to create a thin, even coat. Use just enough to ensure the surface is completely no longer see-through.
- For Ceramics and Glass, thick coat is required.
Drying the laser inks
- Drying time varies by temperature and layer thickness.
- Speed up drying with a hot air gun or blow dryer.
- Ensure the entire layer (not just the top) is dry.
- Warm substrates can be laser marked and may improve results.
Start engraving:
- Adjust your laser settings based on the material you’re working with.
- Please check the general recommended settings by choosing the laser machine you are currently using.
Removing the residue:
- There’s no waiting time required! Once you're done lasering, rinse the surface under tap water or simply wipe it with a wet cloth. That’s it—enjoy your permanent, high-quality mark on your finished product!
Application process using liquid-ready powders:
Application process using liquid-ready powders:
Clean the Surface
- Start by cleaning the material surface with alcohol to remove any dirt or oils.
- Make sure the surface is completely dry before proceeding.
Mix the Liquid-Ready powder with Denatured Alcohol or any Isopropyl Alcohol
- The bottle has markings on the side of the label to guide you in adding denatured alcohol for both brush and spray applications. While both methods work, spray application is recommended, ideally using a Preval spray system.
Apply the prepared laser ink powder
- Using the brush, apply in a left-to-right motion to create a thin, even coat. Use just enough to ensure the surface is completely no longer see-through.
- For Ceramics and Glass, thick coat is required.
Drying the laser inks
- Drying time varies by temperature and layer thickness.
- Speed up drying with a hot air gun or blow dryer.
- Ensure the entire layer (not just the top) is dry.
- Warm substrates can be laser marked and may improve results.
Start engraving:
- Adjust your laser settings based on the material you’re working with.
- Please check the general recommended settings by choosing the laser machine you are currently using.
Removing the residue:
- There’s no waiting time required! Once you're done lasering, rinse the surface under tap water or simply wipe it with a wet cloth. That’s it—enjoy your permanent, high-quality mark on your finished product!
Note: These are just general guidelines, and settings may vary, depending on the laser you are using and the substrate you have for marking.
The below tests were performed on:
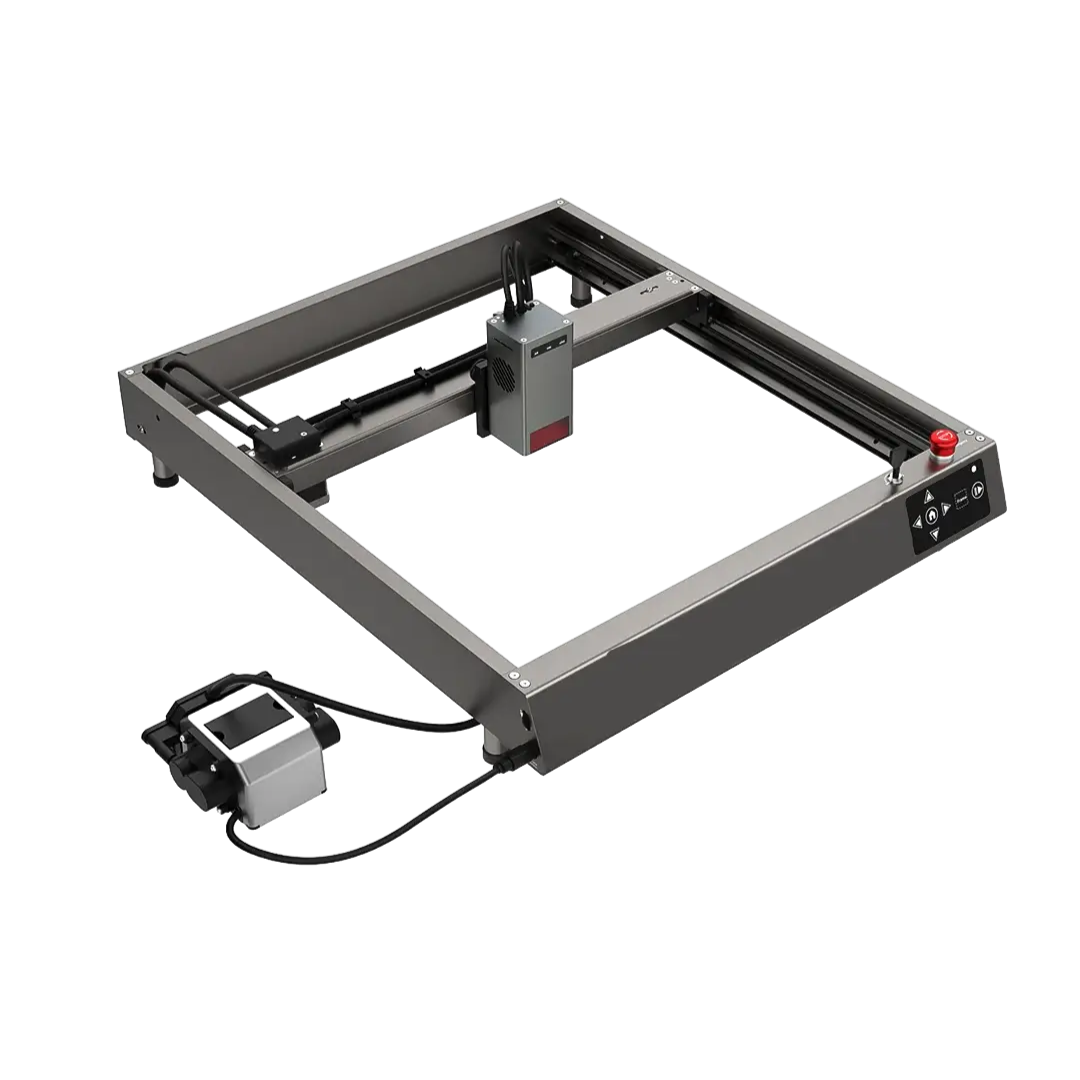
Creality Diode laser
Max Wattage: 40 watts
Speed unit in mm/m ( Millimeters per Minutes)
The below tests were generated by using a 40W Diode Laser, please make sure these specifications match with your laser otherwise, check your laser specifications and make sure the
resultant wattage at 10% as noted in the below tests for Ceramics matches your final settings to get the same result.
- Click HERE on how to read the material test grid.
- Click the button below to learn more about using a Diode Laser with Brilliance Laser Inks.
-
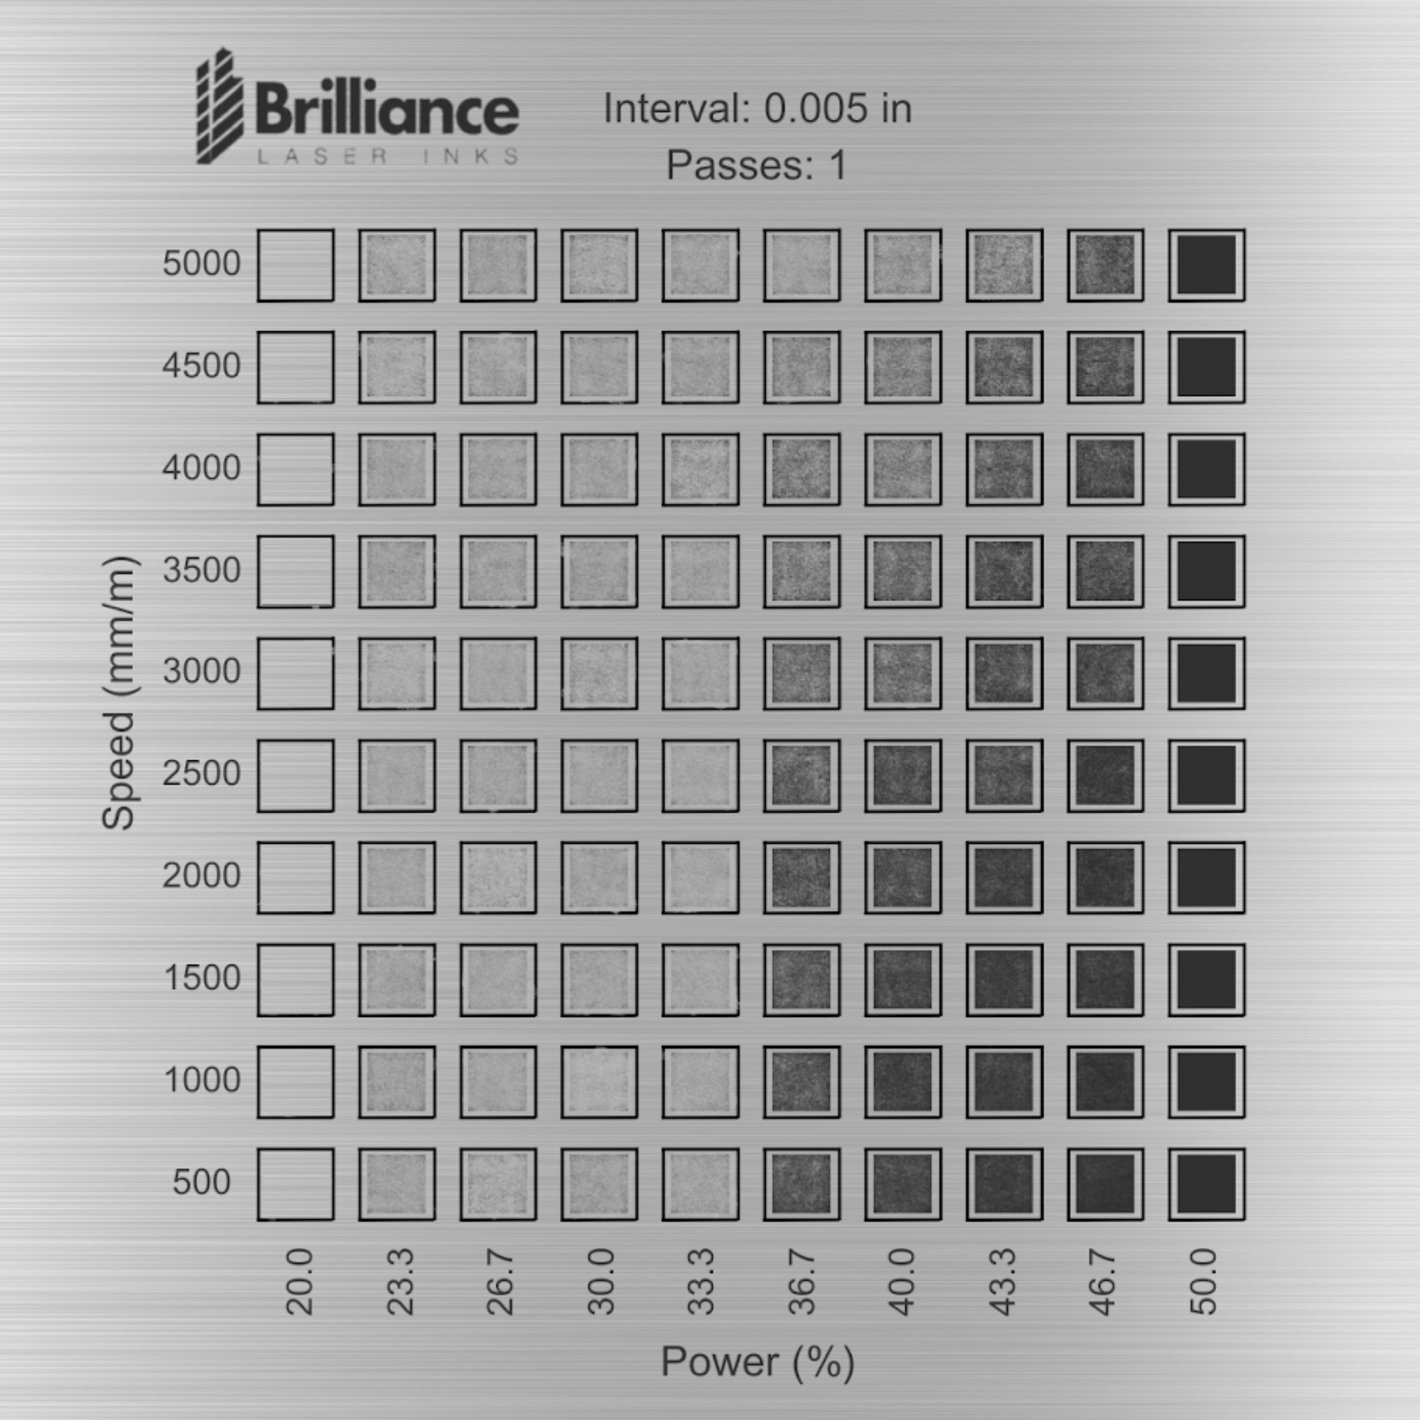
Stainless Steel
Learn MoreProduct: Black Metal Laser Ink (BLI101MBAS)
For engraving on stainless steel using a 40W Diode laser, here are some recommended starting settings:
- Power: 100% (to ensure sufficient energy for marking stainless steel).
- Speed: 750-1000 mm/min (adjust based on the desired depth and clarity).
- DPI (Dots Per Inch): 350-500 for detailed and precise markings.
- Interval: 0.005 inches for fine detail.
-
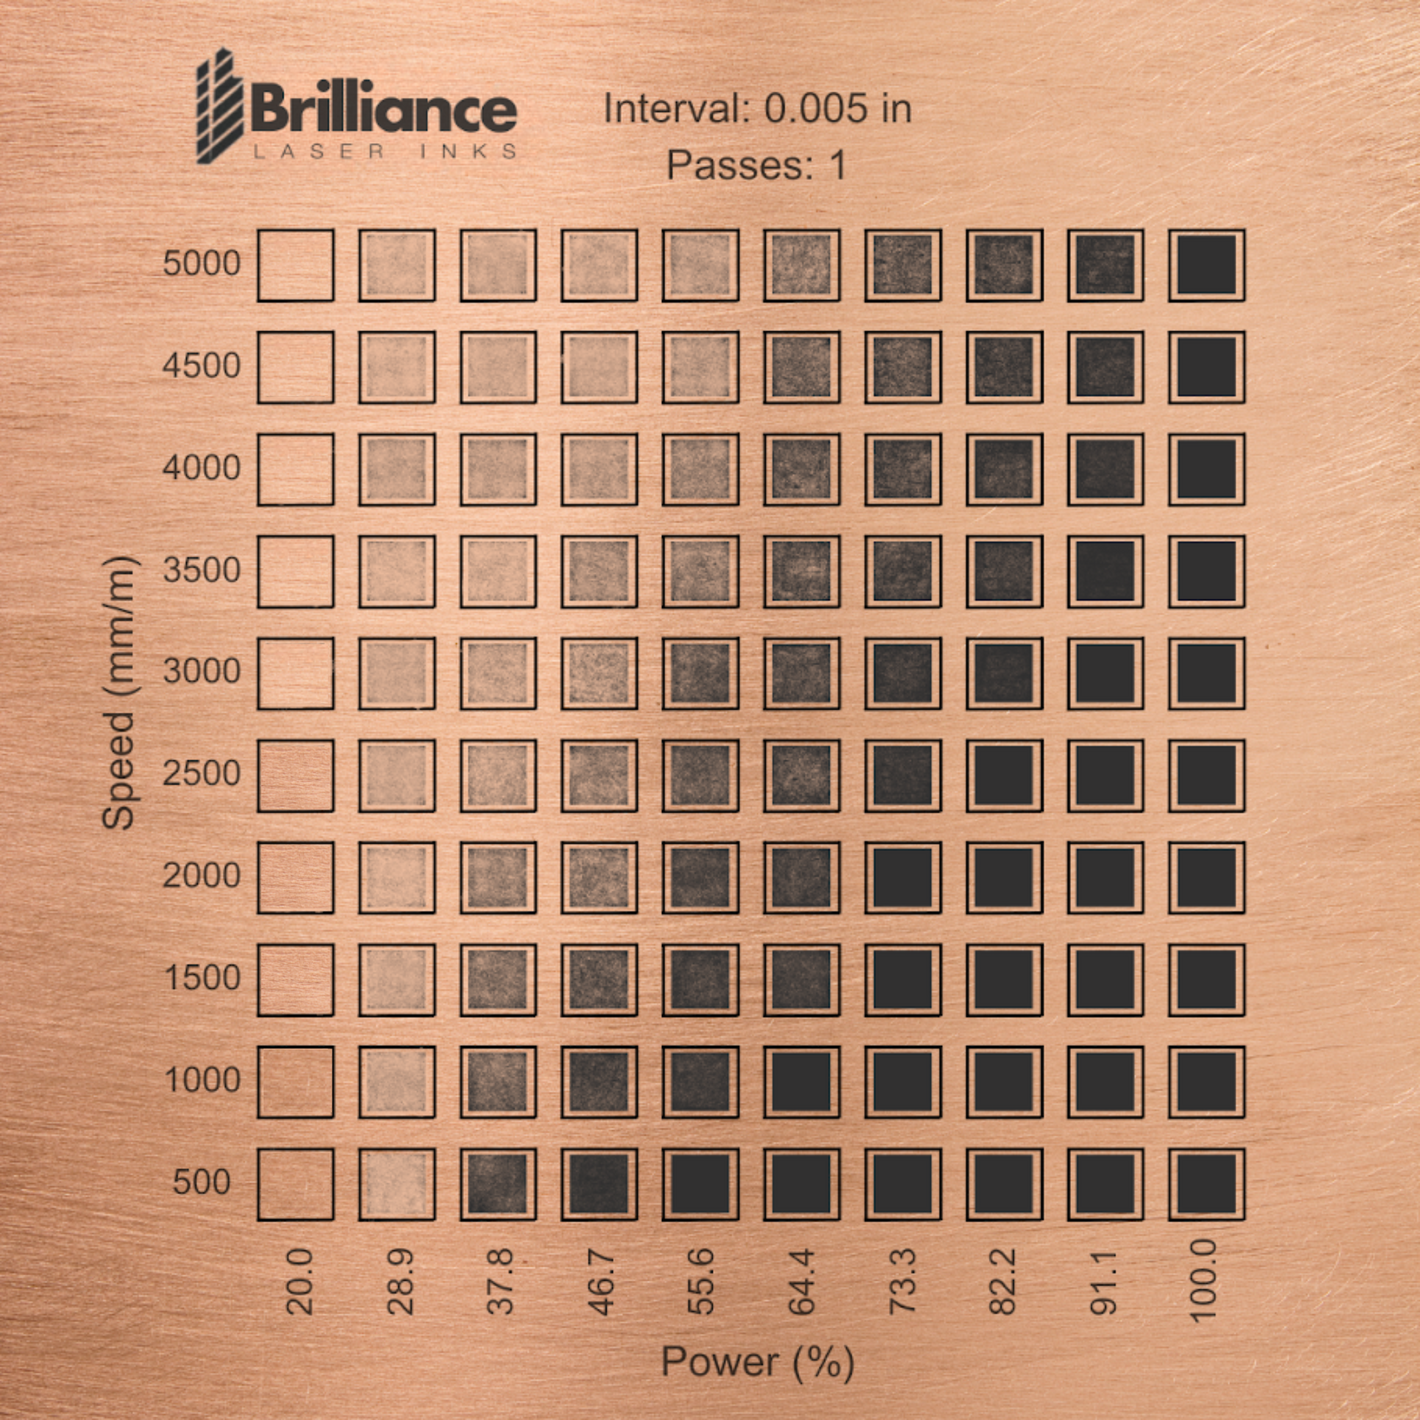
Copper
Learn MoreProduct: Black Metal Laser Ink (BLI101MBAS)
For engraving on copper using a 40W Diode laser, here are some recommended starting settings:
- Power: 100% (to ensure enough energy for marking copper, which is a highly reflective material).
- Speed: 300-500 mm/min (slower speeds allow for better energy absorption and marking).
- DPI (Dots Per Inch): 350-500 for detailed and precise markings.
- Interval: 0.005 inches for fine detail.
Copper can be challenging to engrave due to its reflectivity and thermal conductivity, so these settings may need to be adjusted based on your specific laser and desired results.
-
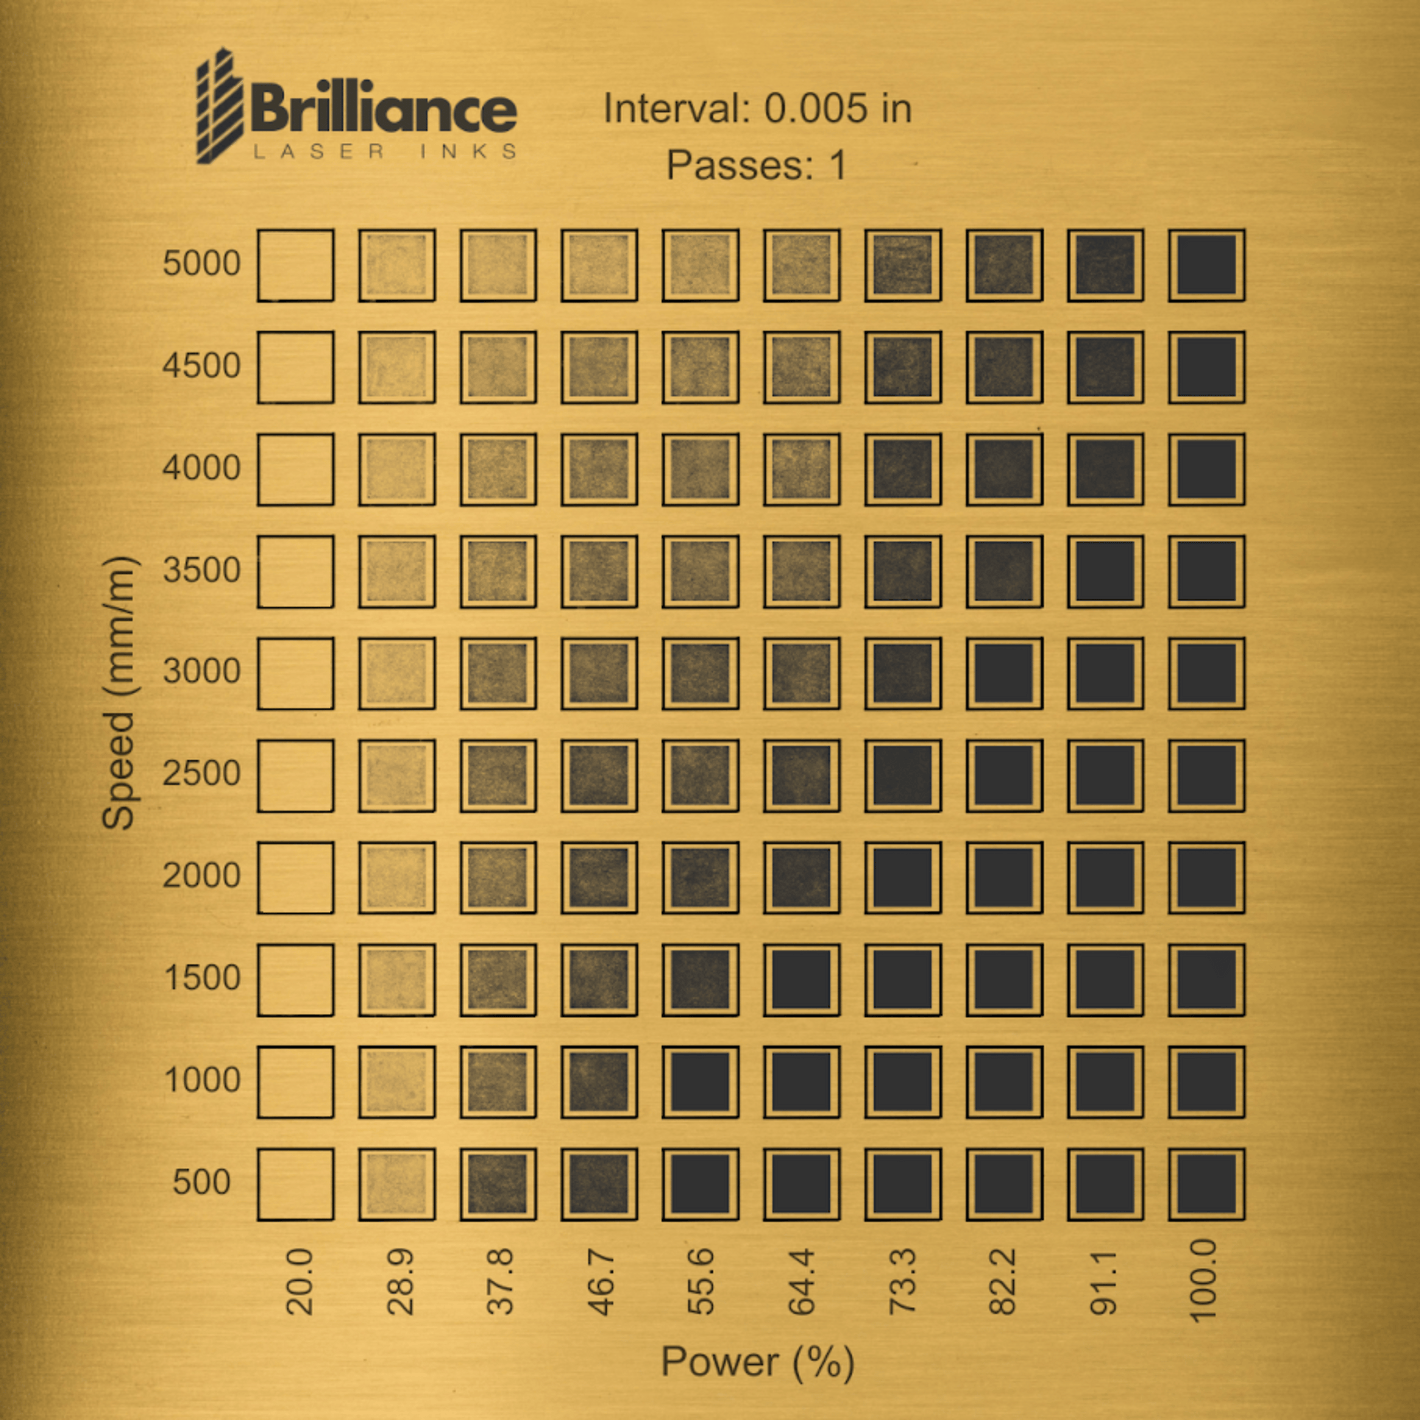
Brass
Learn MoreProduct: Black Metal Laser Ink (BLI101MBAS)
For engraving on brass using a 40W Diode laser, here are some recommended starting settings:
- Power: 100% (brass is reflective and requires maximum power for effective marking).
- Speed: 300-600 mm/min (slower speeds allow for better energy absorption and deeper marks).
- DPI (Dots Per Inch): 350-500 for detailed and precise engravings.
- Interval: 0.005 inches for fine detail and precision.
Brass, like copper, is thermally conductive and reflective, so these settings may need fine-tuning based on your specific laser and desired results.
-
Aluminum
Learn MoreProduct: Black Metal Laser Ink (BLI101MBAS)
For engraving on aluminum using a 40W Diode laser, here are some recommended starting settings:
- Power: 100% (aluminum is reflective and requires maximum power for effective marking).
- Speed: 300-500 mm/min (slower speeds allow for better energy absorption and deeper marks).
- DPI (Dots Per Inch): 350-500 for detailed and precise engravings.
- Interval: 0.005 inches for fine detail and precision.
Aluminum can be challenging to engrave due to its reflectivity and thermal conductivity, so these settings may need fine-tuning based on your specific laser and desired results.
-
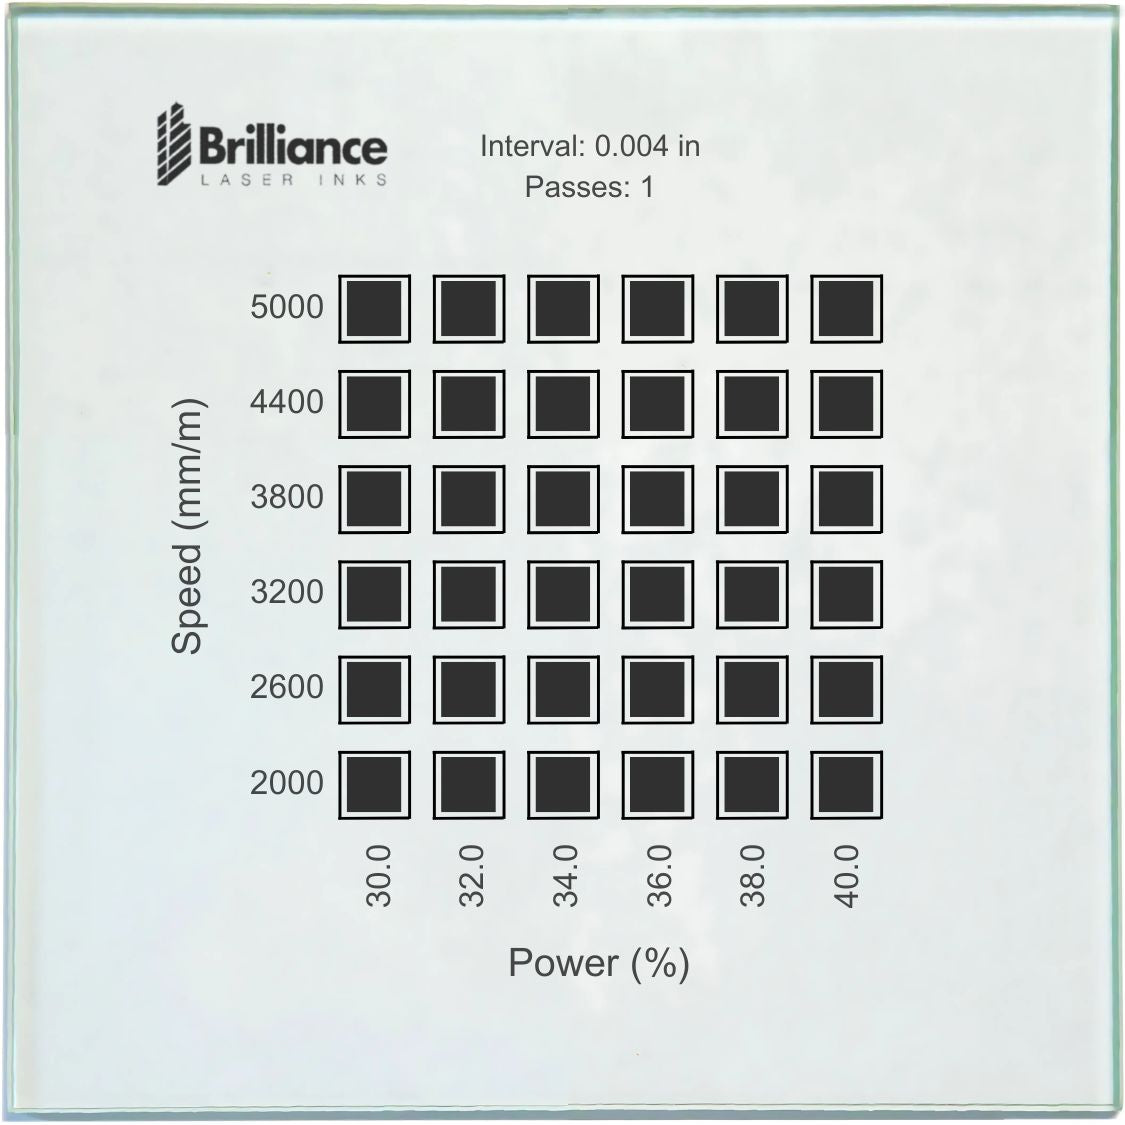
Glass
Learn MoreProduct: Ceramics and Glass Black Laser Marking Ink (BLI420CGBA)
For engraving on glass using a 40W Diode laser, here are some recommended starting settings:
- Power: 100% (glass requires high power for effective marking).
- Speed: 300-500 mm/min (slower speeds allow for better energy absorption and marking).
- DPI (Dots Per Inch): 300-400 for detailed and precise engravings.
- Interval: 0.005 inches for fine detail.
Since glass is brittle, it’s important to avoid excessive heat buildup to prevent cracking. Using a wet paper towel or dish soap on the surface can help dissipate heat and improve marking quality.
-
Ceramics
Learn MoreProduct: Ceramics and Glass Black Laser Marking Ink (BLI420CGBA)
For engraving on ceramics using a 40W Diode laser, here are some recommended starting settings:
- Power: 100% (ceramics require high power for effective marking).
- Speed: 300-600 mm/min (slower speeds allow for better energy absorption and marking).
- DPI (Dots Per Inch): 300-400 for detailed and precise engravings.
- Interval: 0.005 inches for fine detail.
For ceramics, using a laser marking spray or coating can enhance the contrast and visibility of the engraving.


Note: These are just general guidelines, and settings may vary, depending on the laser you are using and the substrate you have for marking.
The below tests were performed on:
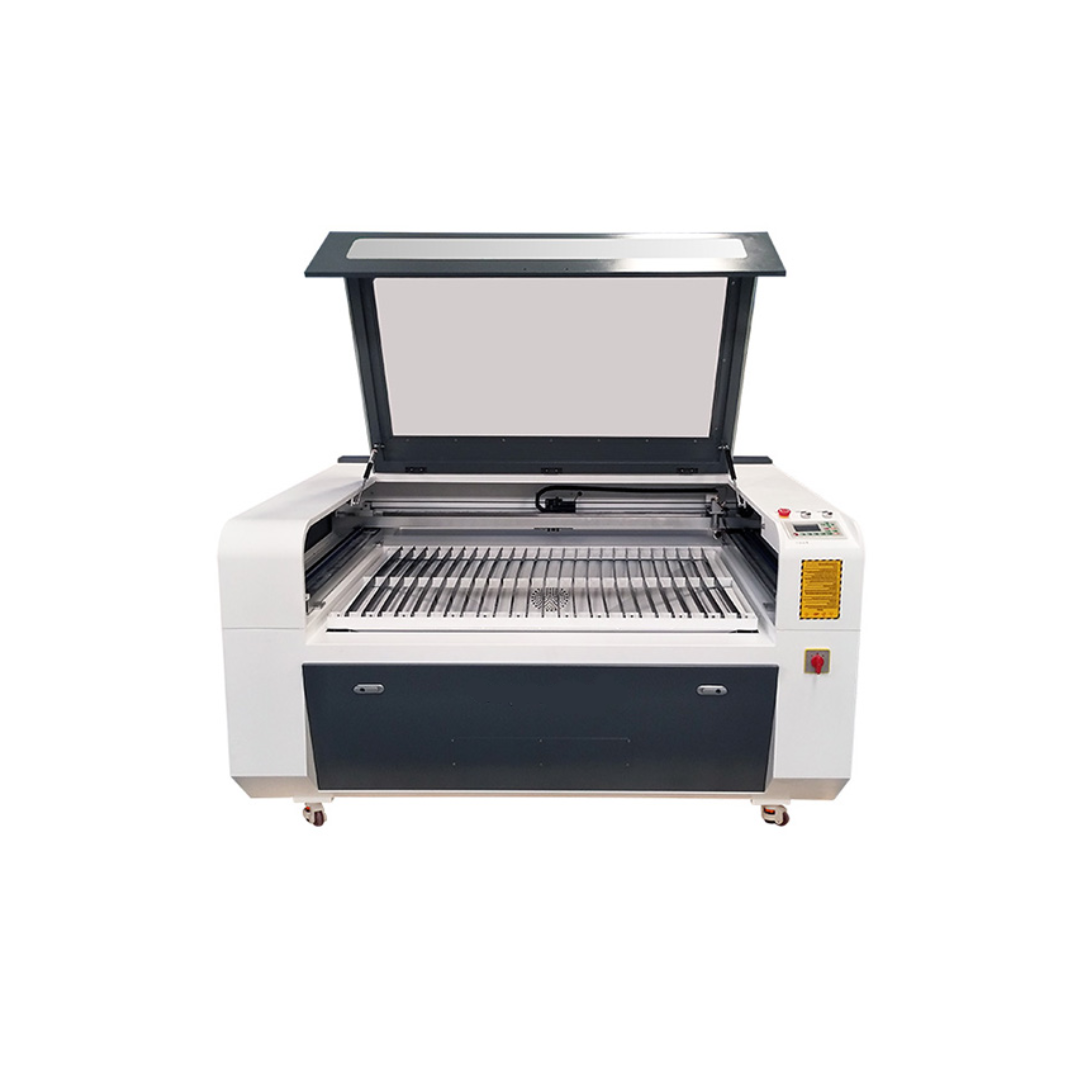
CO2 Laser
Max Wattage: 80 watts
Speed unit in mm/m ( millimeters per seconds)
The below tests were generated by using a 80W CO2 Laser, please make sure these specifications match with your laser otherwise, check your laser specifications and make sure the resultant wattage at 10% as noted in the below tests for Ceramics matches your final settings to get the same result.
Click HERE on how to read the material test grid.
-
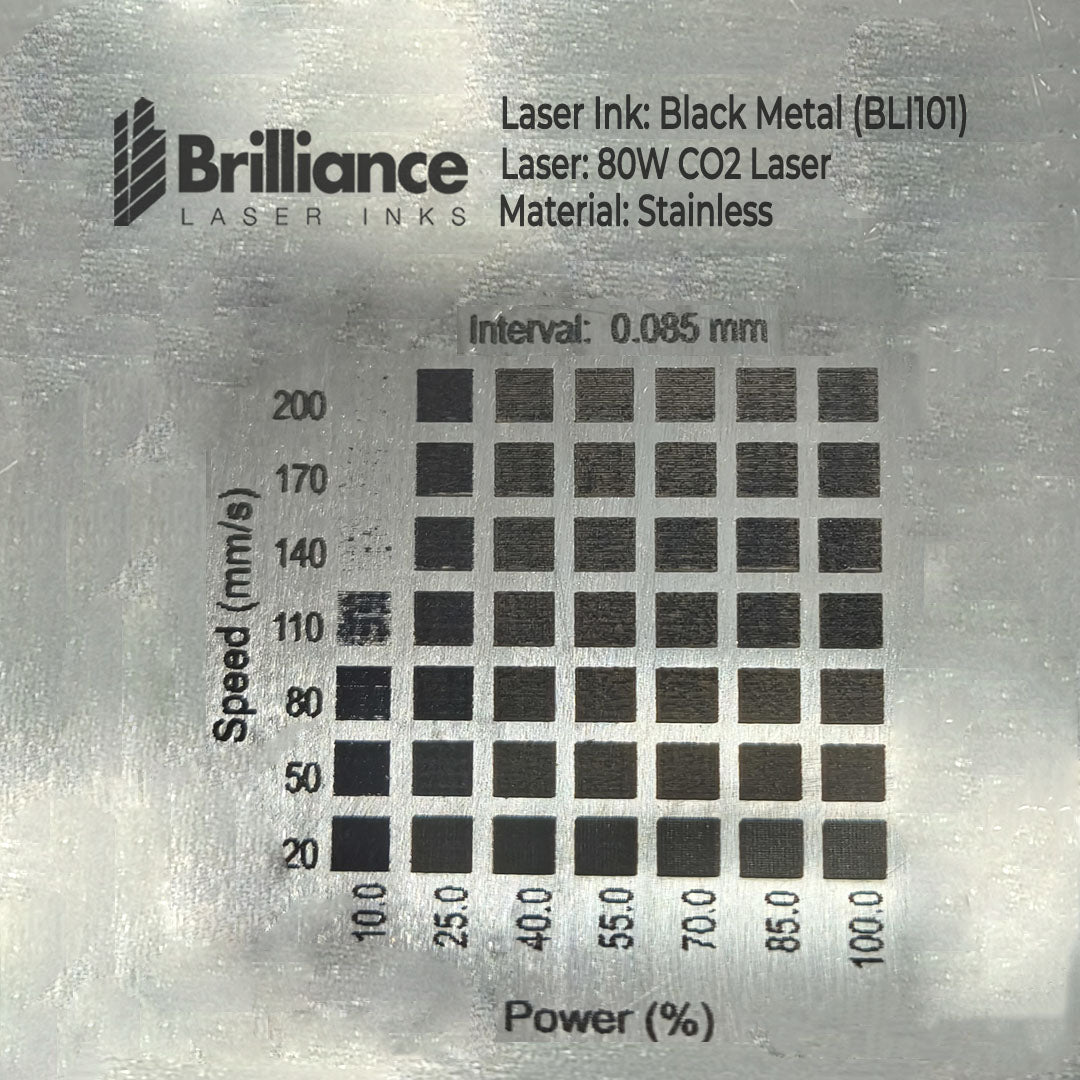
Stainless Steel
Product: Black Metal Laser Ink (BLI101MBAS)
For an 80W CO2 laser on stainless steel, the recommended settings can vary depending on the desired outcome (e.g., engraving depth, marking clarity). Based on the test grid in your image, here are some general guidelines:
- Power: Start with 70-85% for clear, visible markings. Higher power (85-100%) can be used for deeper engravings.
- Speed: Use a slower speed, around 50-110 mm/s, for more pronounced markings. Faster speeds (140-200 mm/s) are better for lighter, surface-level marks.
- Interval: Stick with the 0.085 mm interval as shown in your test grid for consistent results.
-
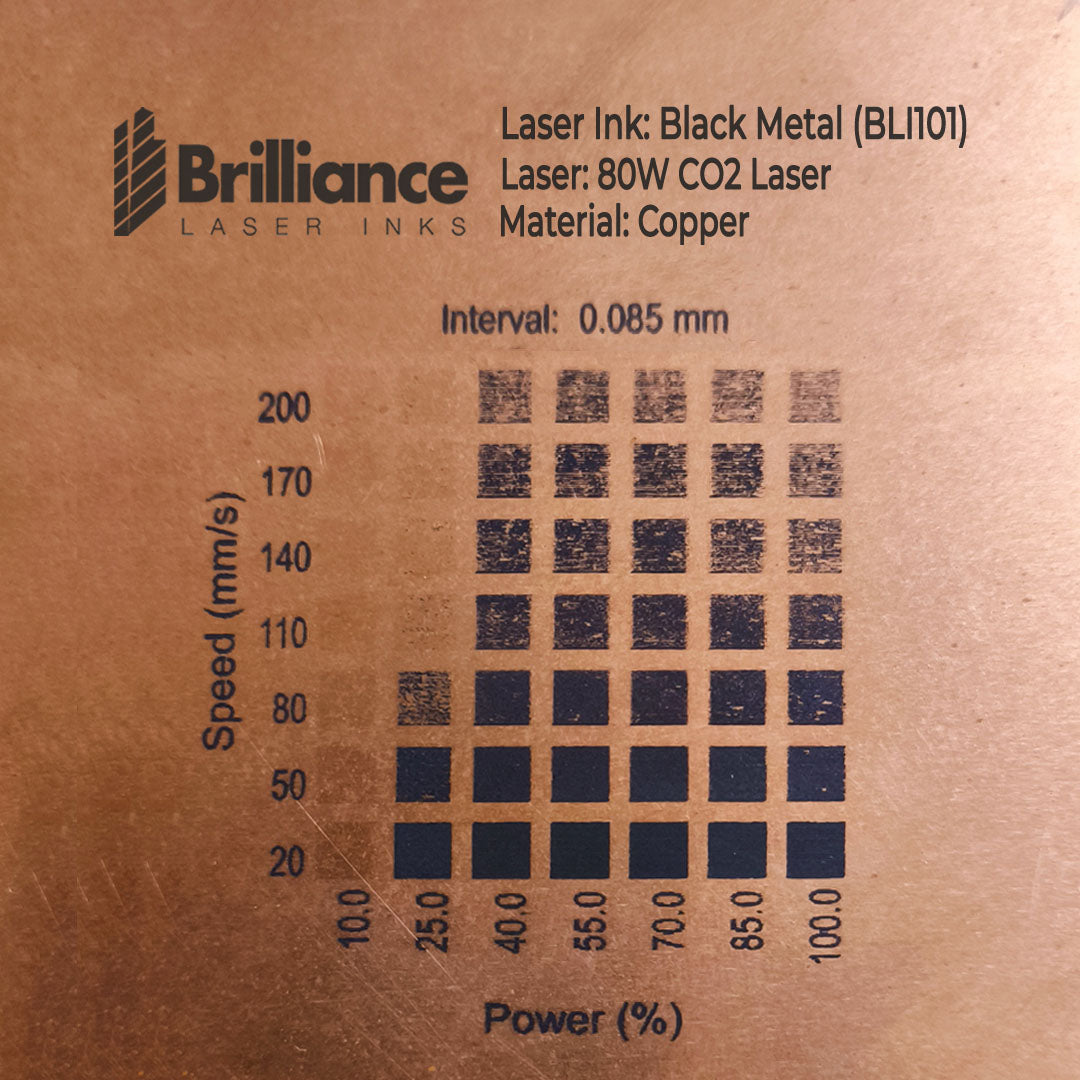
Copper
Product: Black Metal Laser Ink (BLI101MBAS)
To recommend settings for engraving on copper using Black Metal (BLI101) laser ink with an 80W CO2 laser, here’s a general guideline based on the grid provided:
- Power: Start with 70-85% for a strong and visible mark.
- Speed: Use a moderate speed, around 50-110 mm/s, to balance precision and depth.
- Interval: Stick with the specified 0.085 mm for optimal spacing.
-
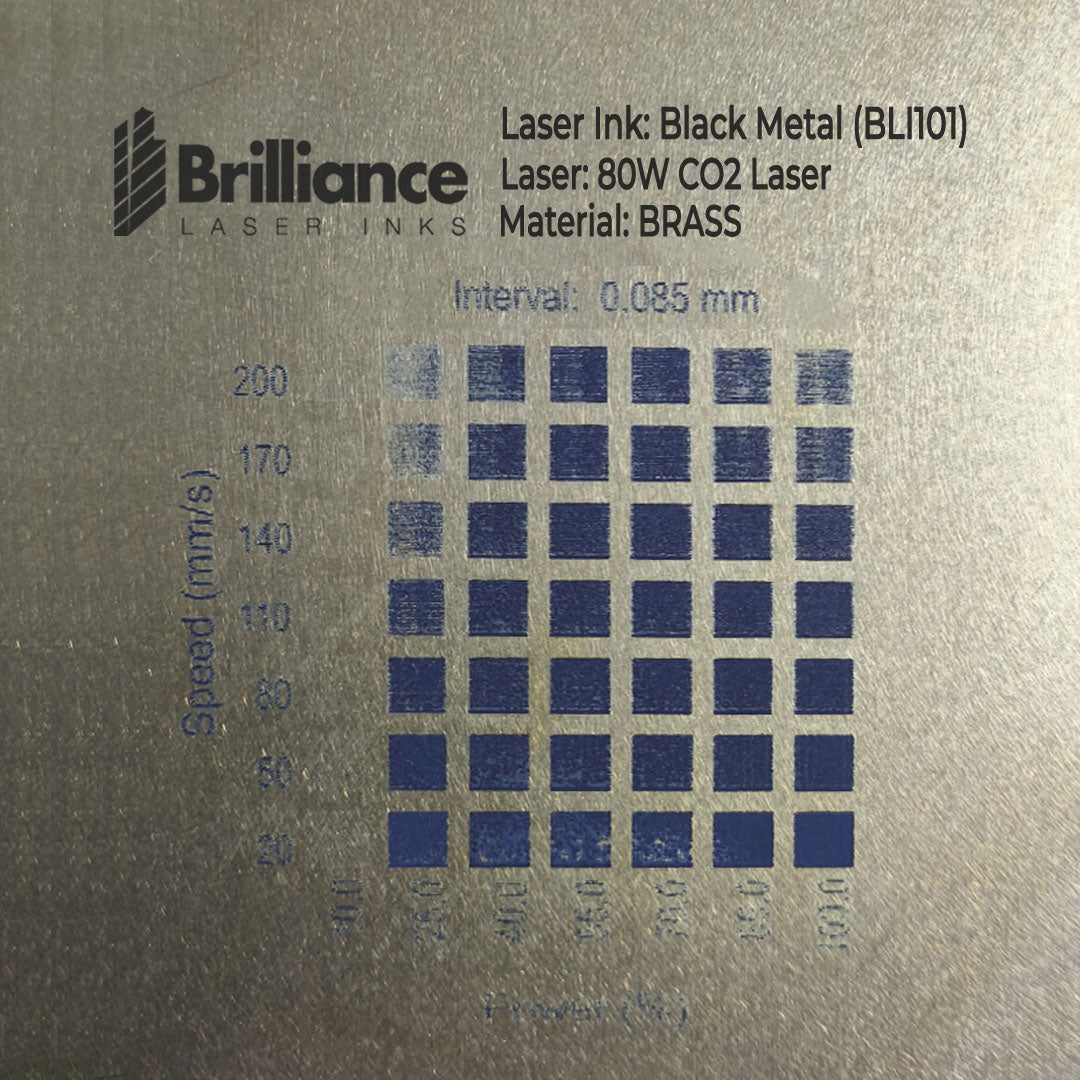
Brass
Product: Black Metal Laser Ink (BLI101MBAS)
For engraving on brass using Black Metal (BLI101) laser ink with an 80W CO2 laser, here are the recommended starting settings based on the grid:
- Power: 70-90% for a strong and visible mark.
- Speed: 50-110 mm/s to balance precision and depth.
- Interval: 0.085 mm as specified for optimal spacing.
-
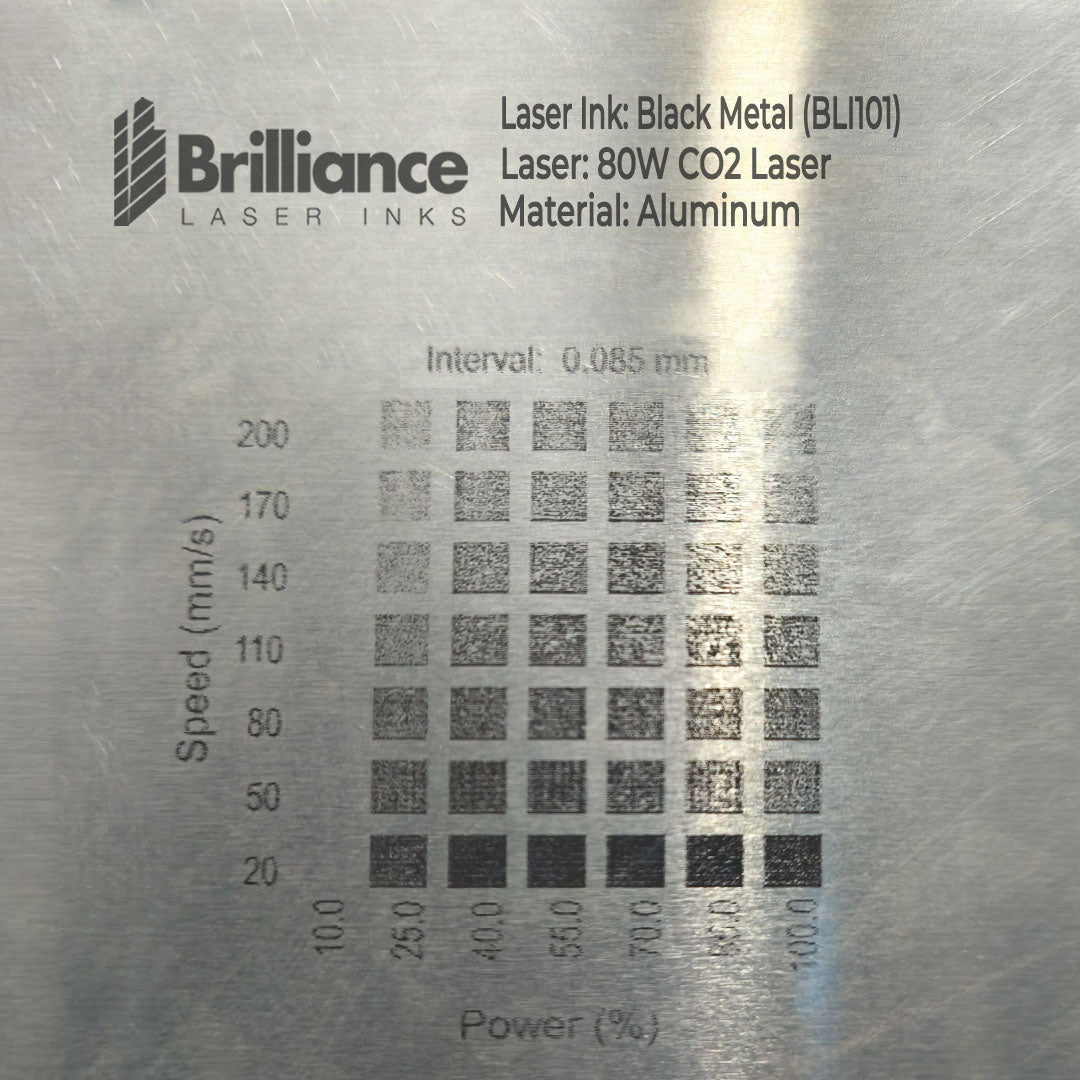
Aluminum
Product: Black Metal Laser Ink (BLI101MBAS)
For engraving aluminum with an 80W CO2 laser, here are some recommended settings based on the test grid in your image:
- Power: Start with 70-85% for clear, visible markings. For deeper engravings, you can increase to 100%.
- Speed: Use a slower speed, around 50-110 mm/s, for more pronounced markings. Higher speeds (140-200 mm/s) are better for lighter, surface-level marks.
- Interval: Stick with the 0.085 mm interval as shown in your test grid for consistent results.
-
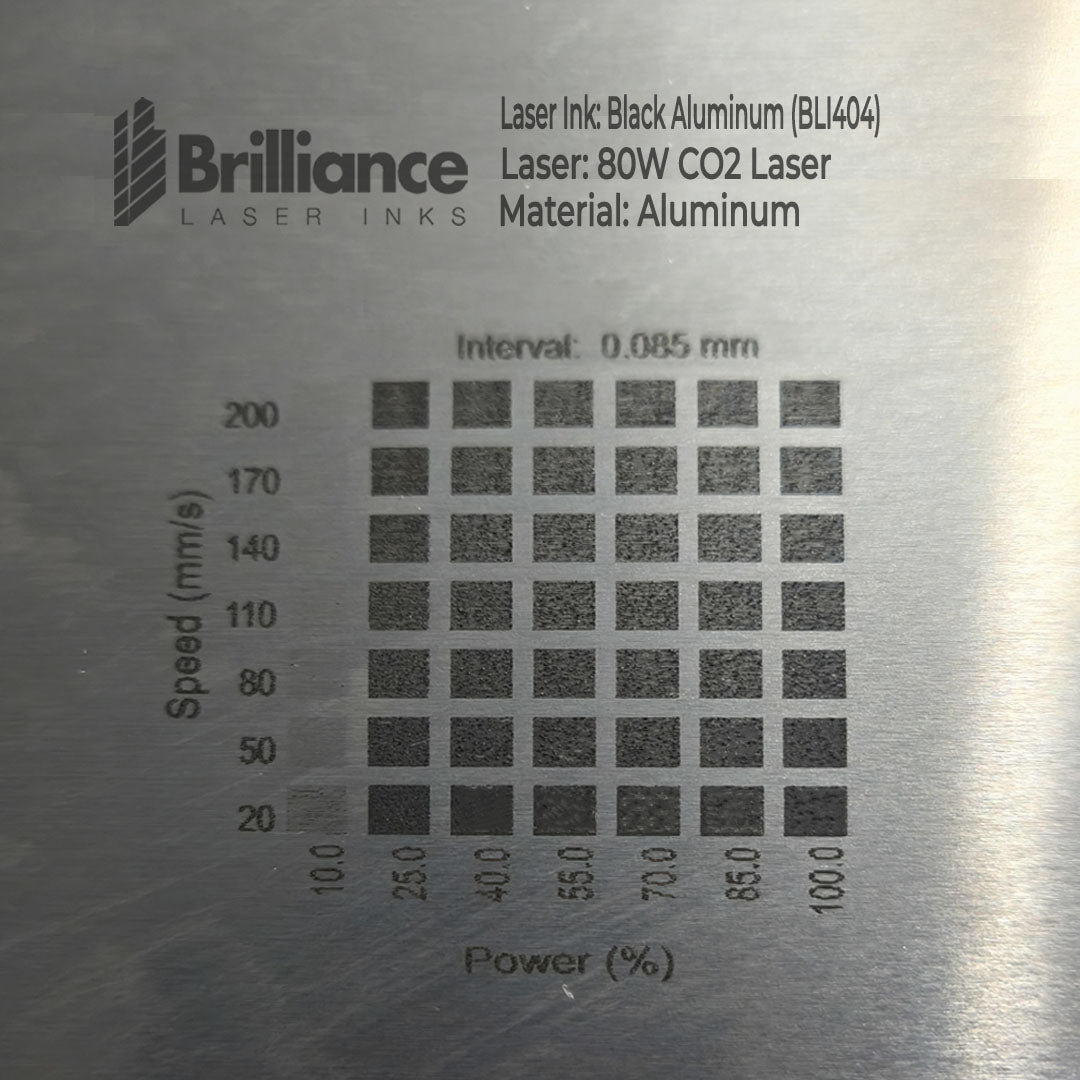
Aluminum
Product: Black Aluminum Laser Ink (BLI404ABAS)
For engraving aluminum with an 80W CO2 laser, here are some recommended settings based on your test grid:
- Power: Start with 70-85% for clear, visible markings. For deeper engravings, increase to 100%.
- Speed: Use a slower speed, around 50-110 mm/s, for more pronounced markings. Higher speeds (140-200 mm/s) are better for lighter, surface-level marks.
- Interval: Stick with the 0.085 mm interval for consistent results.
-
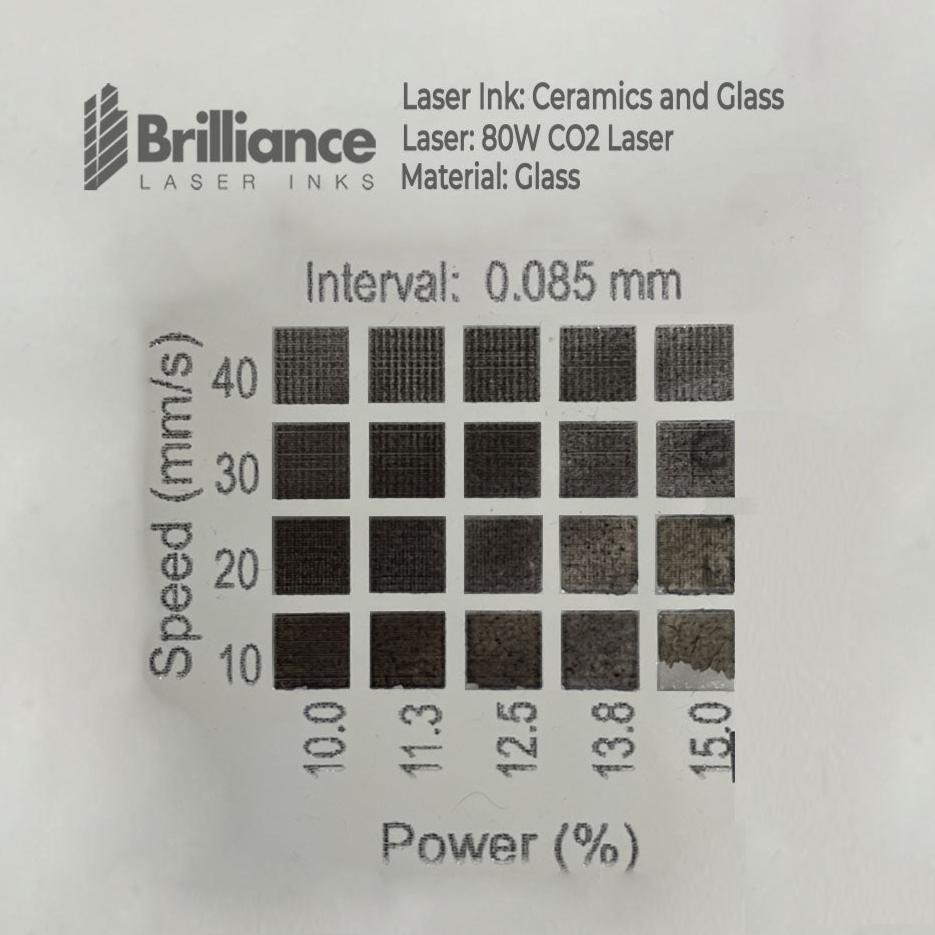
Glass
Product: Ceramic and Glass Laser Ink (BLI420CGBA)
For engraving glass with an 80W CO2 laser, here are some recommended settings based on the test grid:
- Power: Use a lower power setting, around 10-15%, to avoid cracking or chipping the glass.
- Speed: Opt for slower speeds, such as 10-30 mm/s, to ensure precise and clean engravings.
- Interval: Stick with the 0.085 mm interval for consistent results.
-
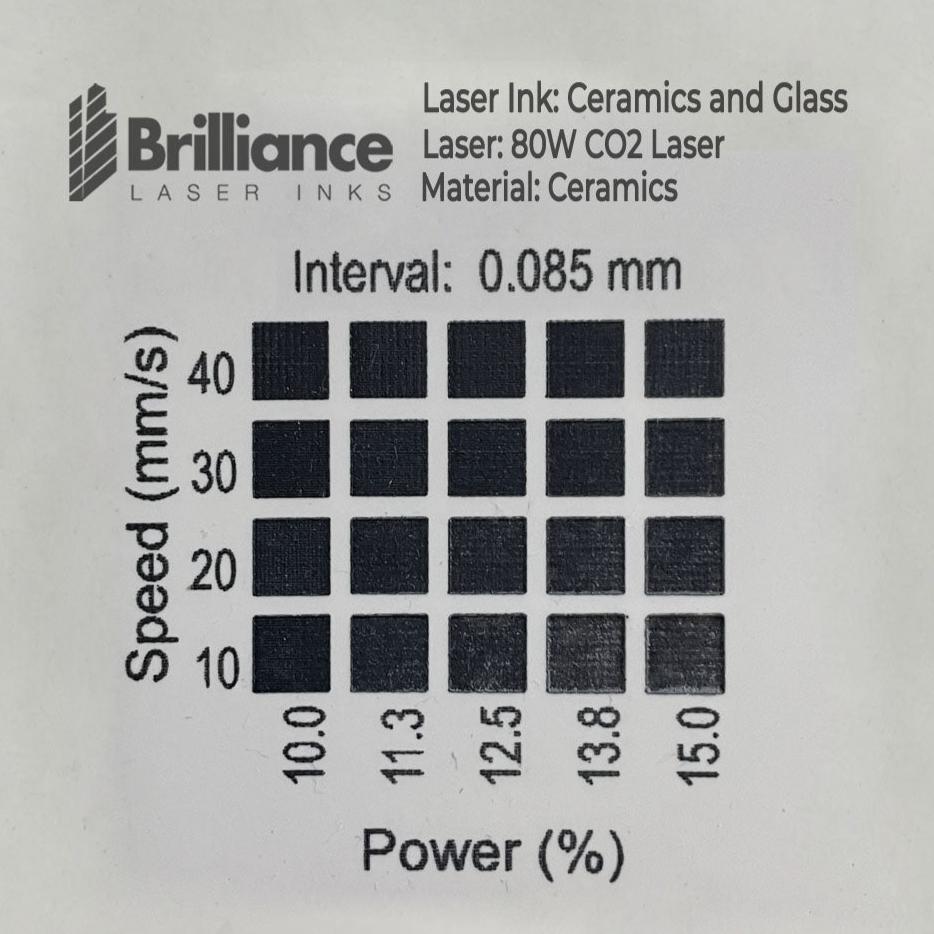
Ceramics
Product: Ceramic and Glass Laser Ink (BLI420CGBA)
For engraving ceramics with an 80W CO2 laser, here are some recommended settings based on the test grid:
- Power: Use a lower power setting, around 10-15%, to avoid damaging the ceramic surface.
- Speed: Opt for slower speeds, such as 10-30 mm/s, to ensure precise and clean engravings.
- Interval: Stick with the 0.085 mm interval for consistent results.


- The material test grids were created using a 20-Watt Fiber Laser.
- Fiber lasers can vary in Q-Frequency, maximum speed, power, and how they display speed (e.g., IPS, mm/s, mm/min, or percentage).
- If your machine’s maximum frequency is below 400 kHz, try setting the frequency to its maximum and adjust the power and speed accordingly.
- Access the advanced settings for frequency and check if it’s possible to override the limit to 200 kHz for improved performance.
- Note that “Q Frequency” and “Frequency” are often the same setting on some fiber laser machines.
- Ensure the frequency setting is displayed in kilohertz (kHz) for accuracy.
- Click HERE on how to read the material test grid.
-
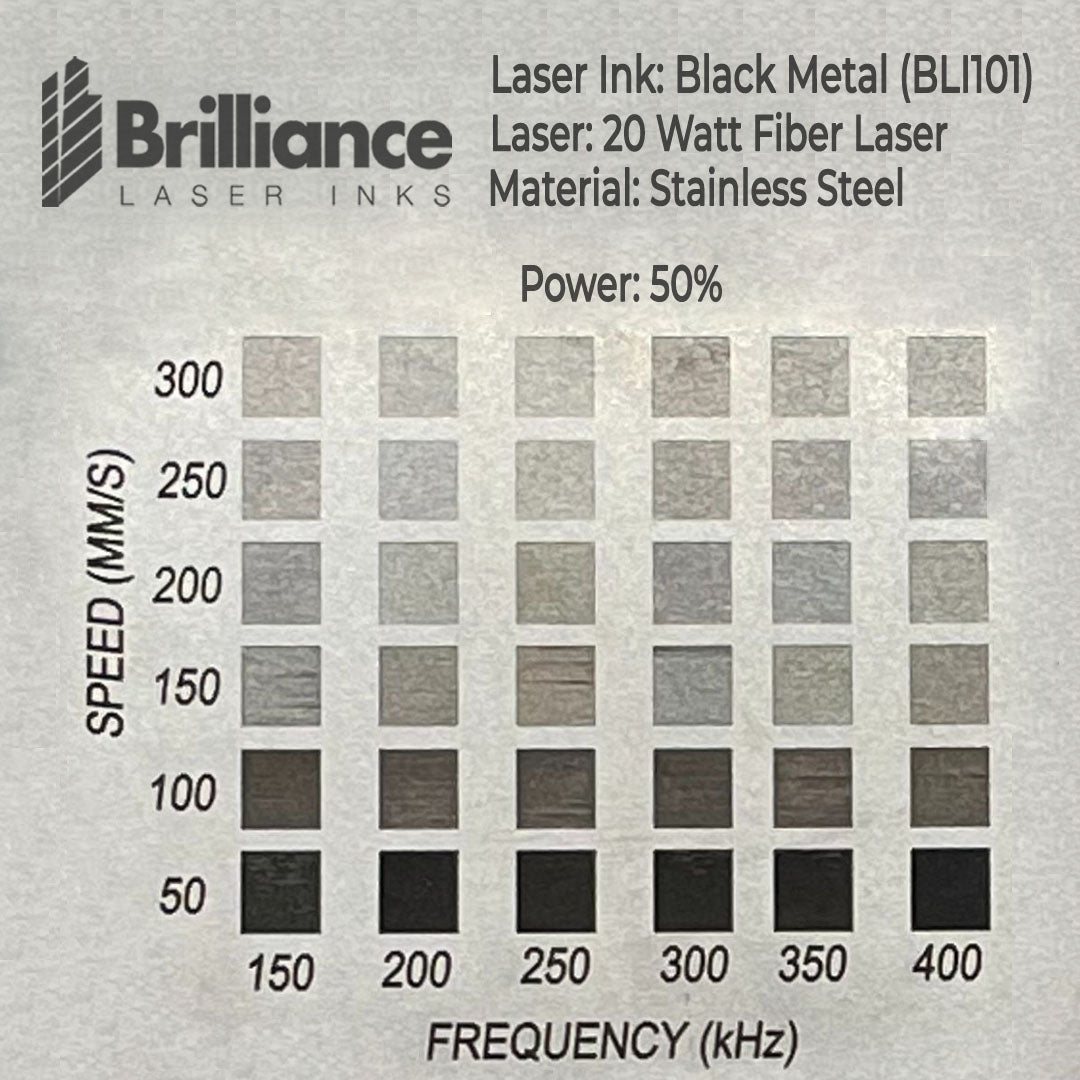
Stainless Steel
Product: Ceramic and Glass Laser Ink (BLI420CGBA)
-
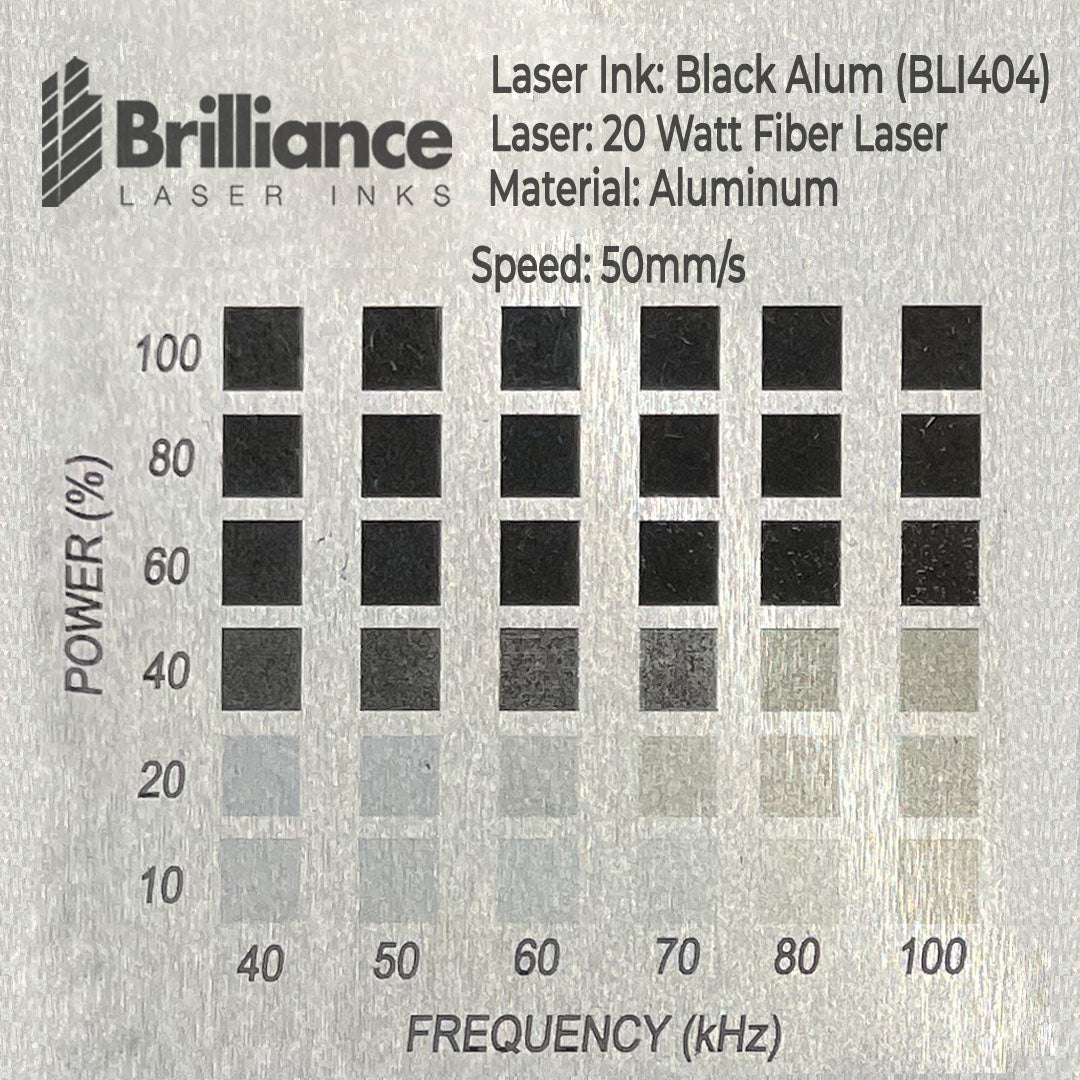
Aluminum
Product: Black Aluminum Laser Ink (BLI404ABAS)
-
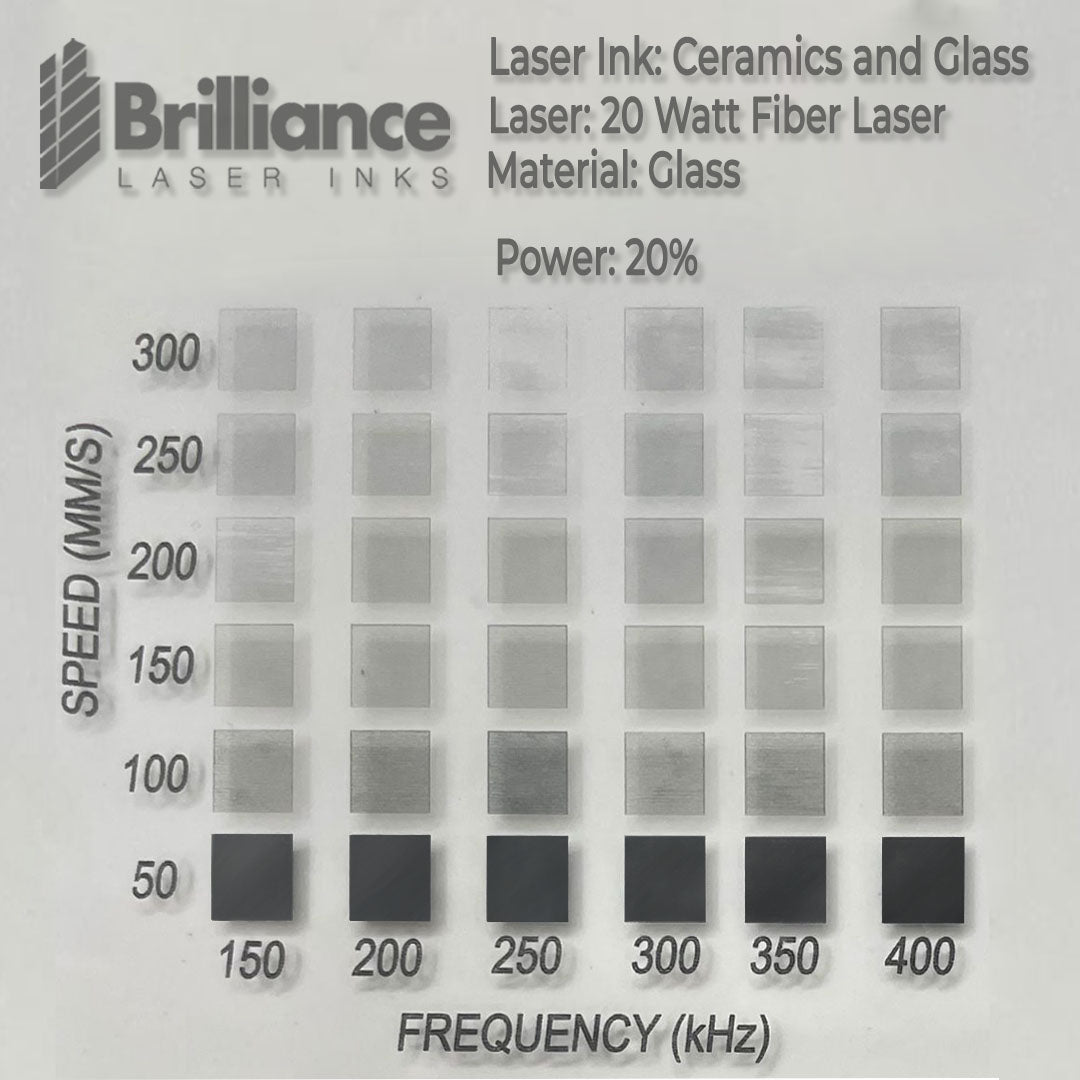
Glass
Product: Ceramic and Glass Laser Ink (BLI420CGBA)
-
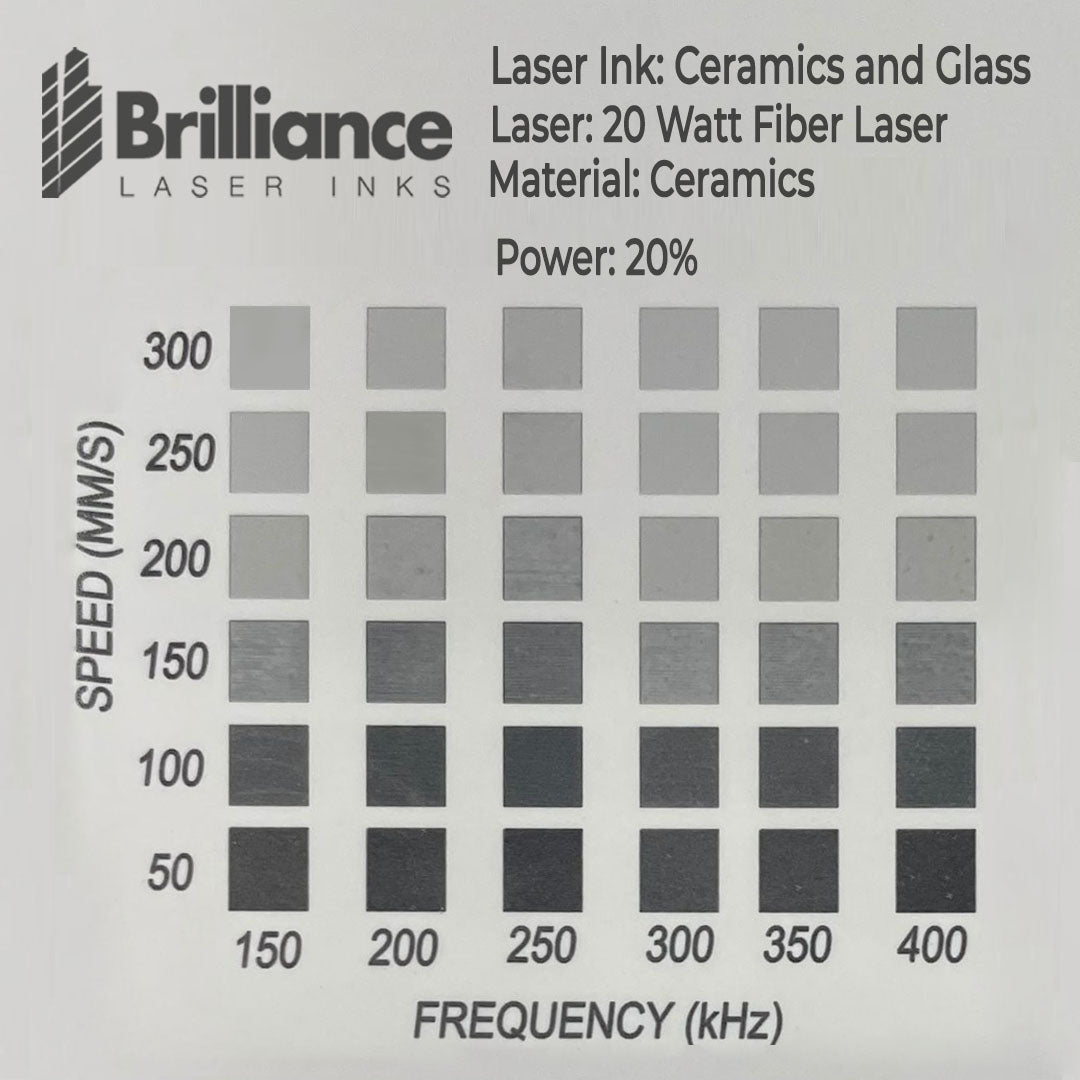
Ceramics
Product: Ceramic and Glass Laser Ink (BLI420CGBA)