TABLE OF CONTENTS
1. Table Settings
2. How to read material test
3. Grid Settings
4. Quick Guides
5. Disclaimer
5.1 Safety Precautions
5.2 Best Practices
5.3 Operational Guidelines
5.4 Resources and Key Points
6. FAQ's
Table Settings


Note: These are just general guidelines, and settings may vary,
depending on the laser you are using and the substrate you have for marking.
The above test was performed on:
Creality Diode laser
Max Wattage: 40 watts
Speed unit in mm/m ( Millimeters per Minutes)
The above test table settings were generated by using a 40W
Diode Laser, please make sure these specifications match with your
laser otherwise, check your laser specifications and make sure the
resultant wattage at 10% as noted in the above table for Ceramics
matches your final settings to get the same result.
For Example:
10% of 40 watt = 4 watt
20% of 20 watt = 4 watt
Storage: Keep all Brilliance Laser Inks products stored in a clean, dry,
and dark environment, maintaining a room temperature for optimal
preservation

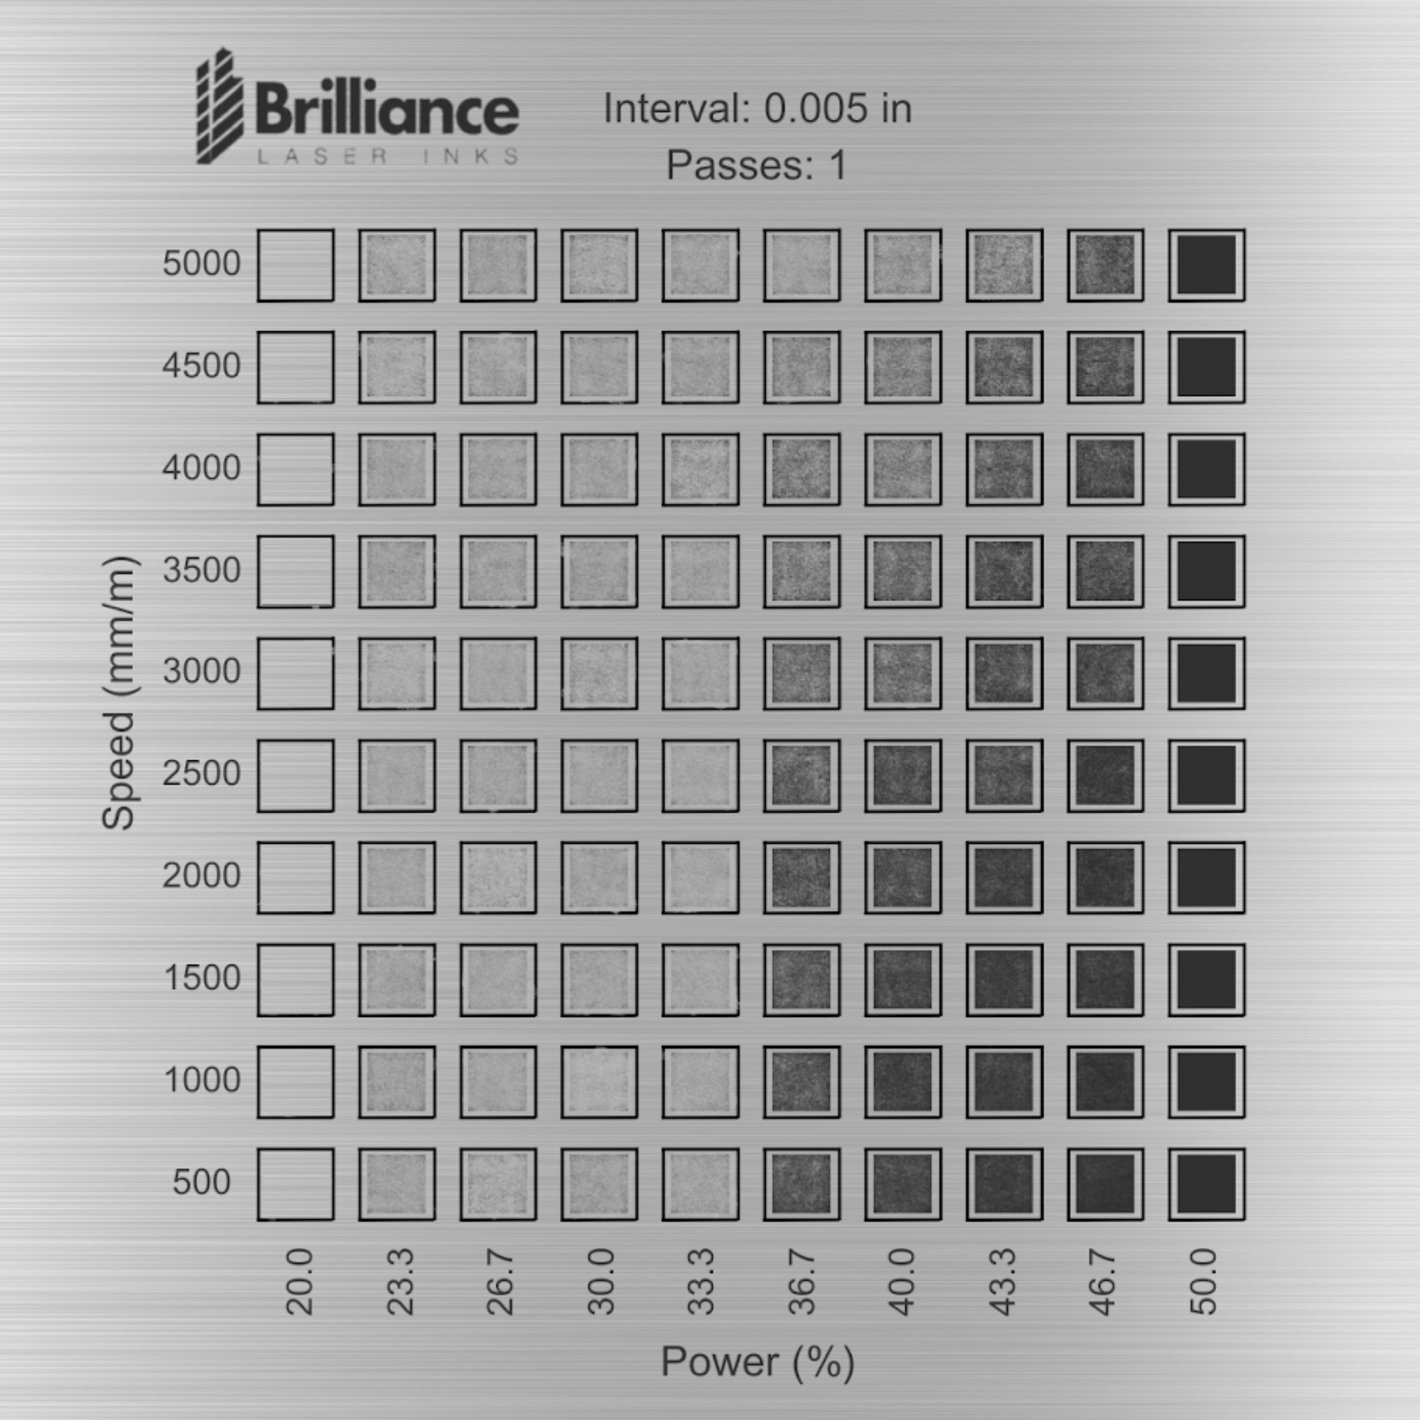
Grid Settings
-
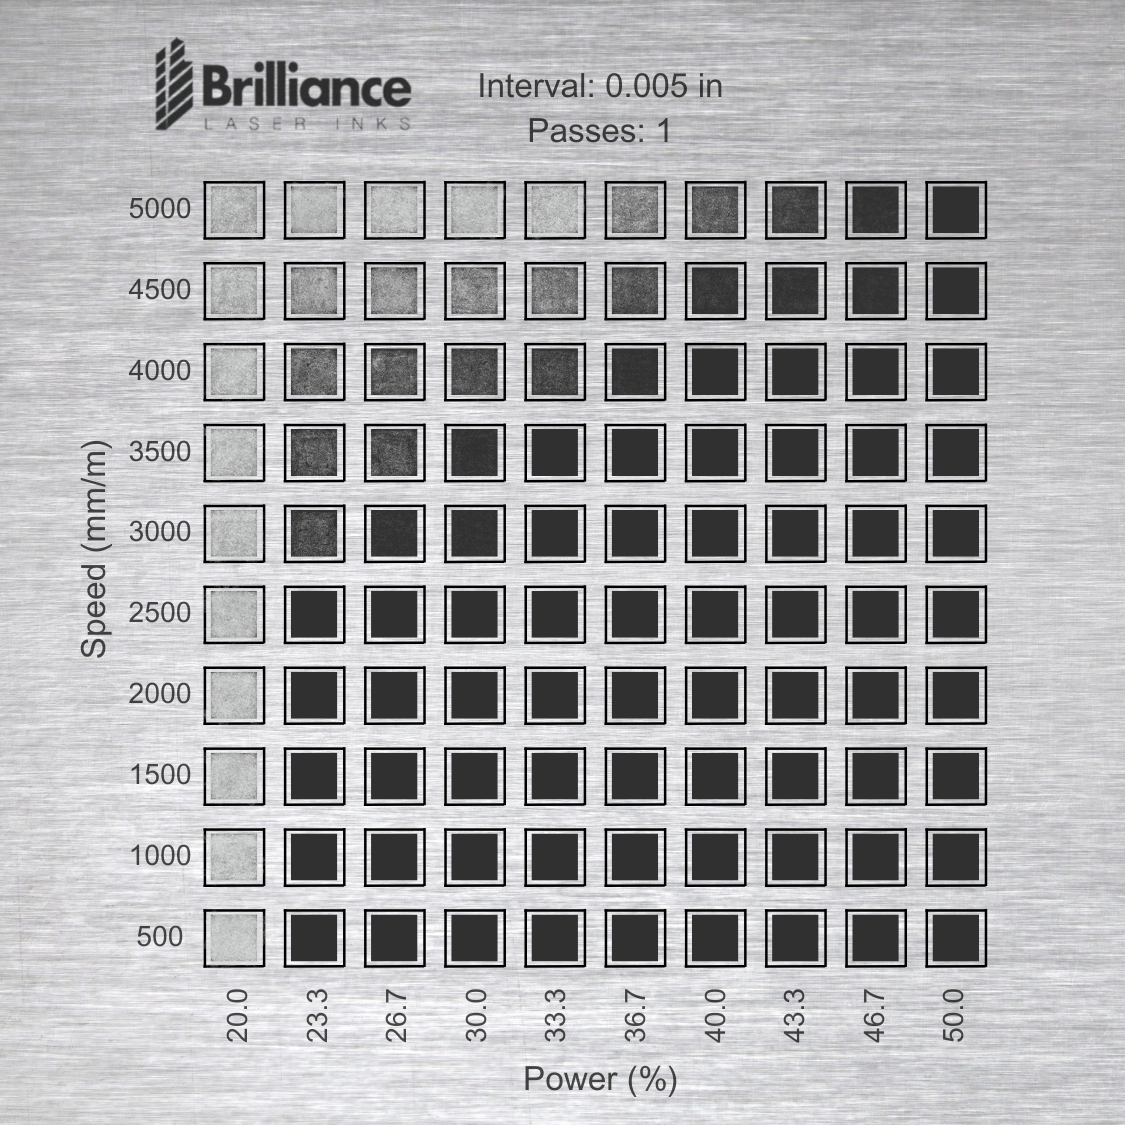
Stainless Steel
Read More- Laser Ink: Universal Black Metal (BLI101)
- Variety: Aerosols, Powders, & liquid-ready
- Laser: 40 Watt Creality Diode Laser
- Materials: Stainless steel
Note: These are just general guidelines, and settings may vary depending on the laser you are using and the substrate you have for marking.
-
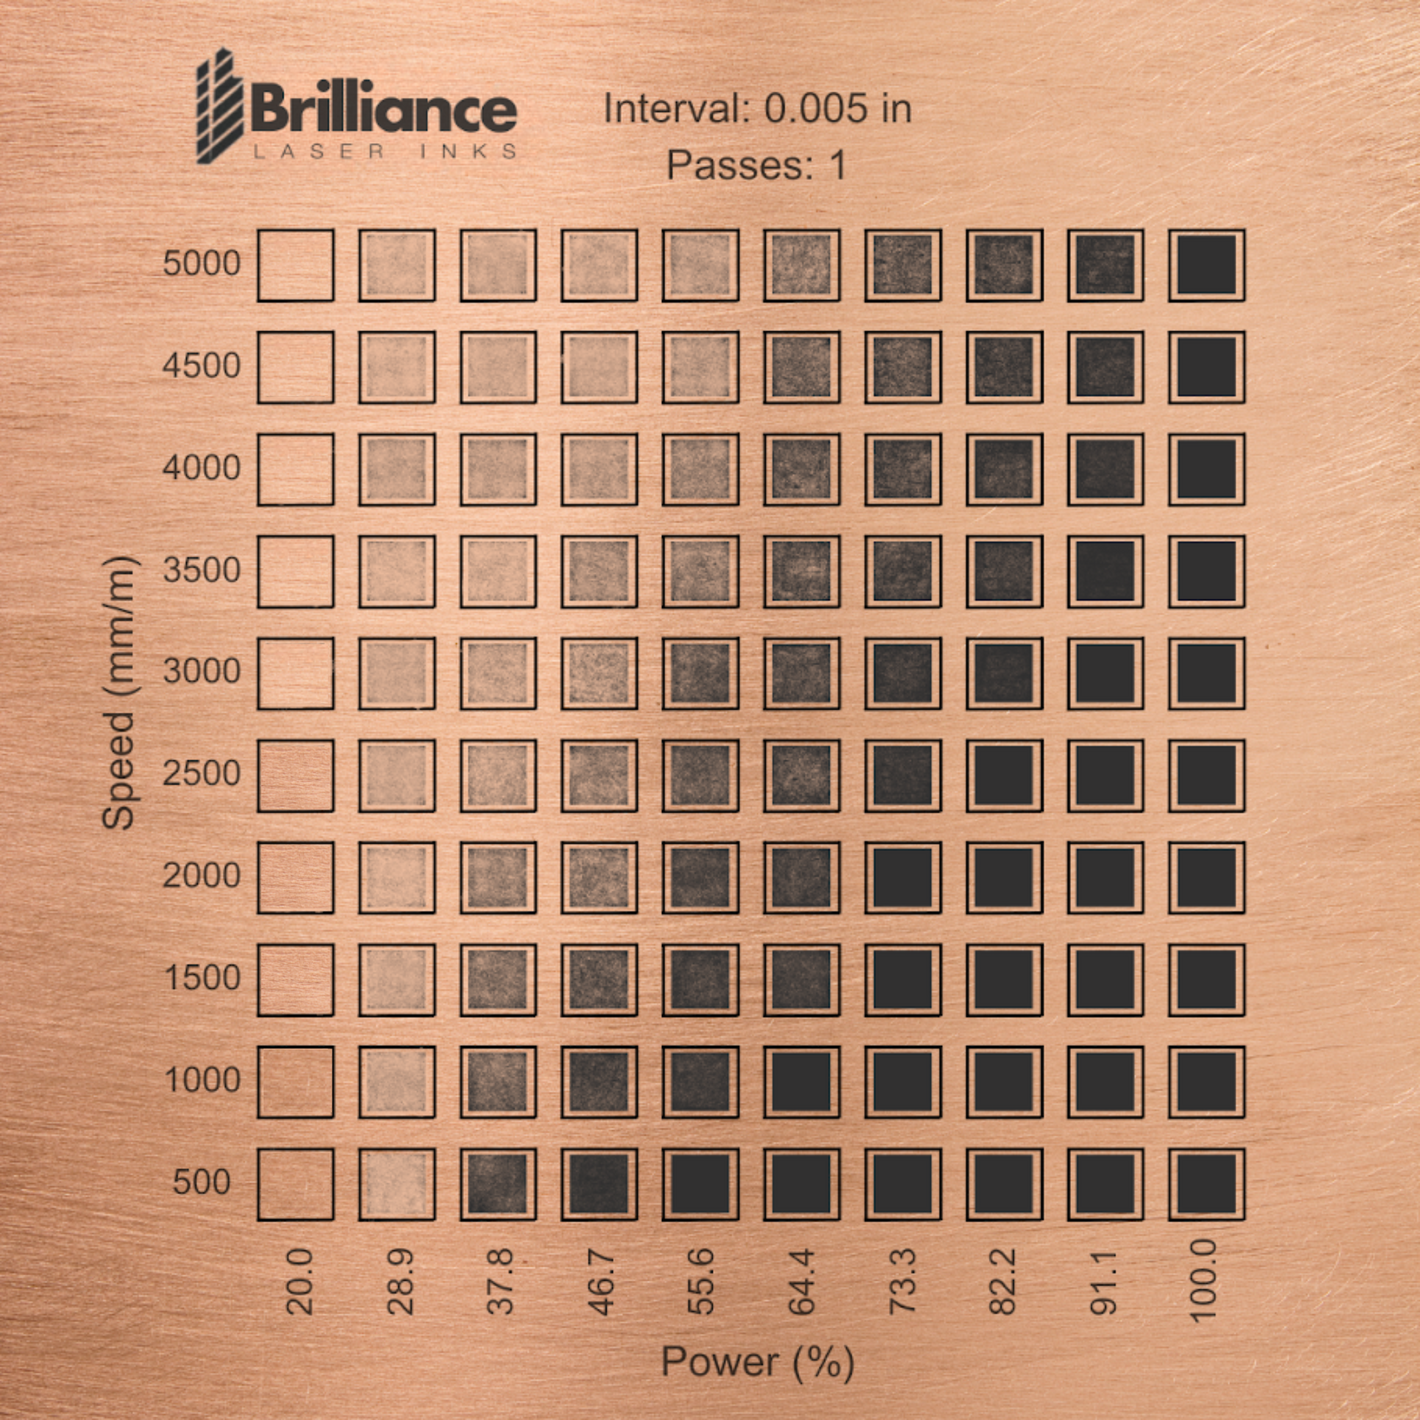
Copper
- Laser Ink: Universal Black Metal (BLI101)
- Variety: Aerosols, Powders, & liquid-ready
- Laser: 40 Watt Creality Diode Laser
- Materials: Copper
Note: These are just general guidelines, and settings may vary depending on the laser you are using and the substrate you have for marking.
-
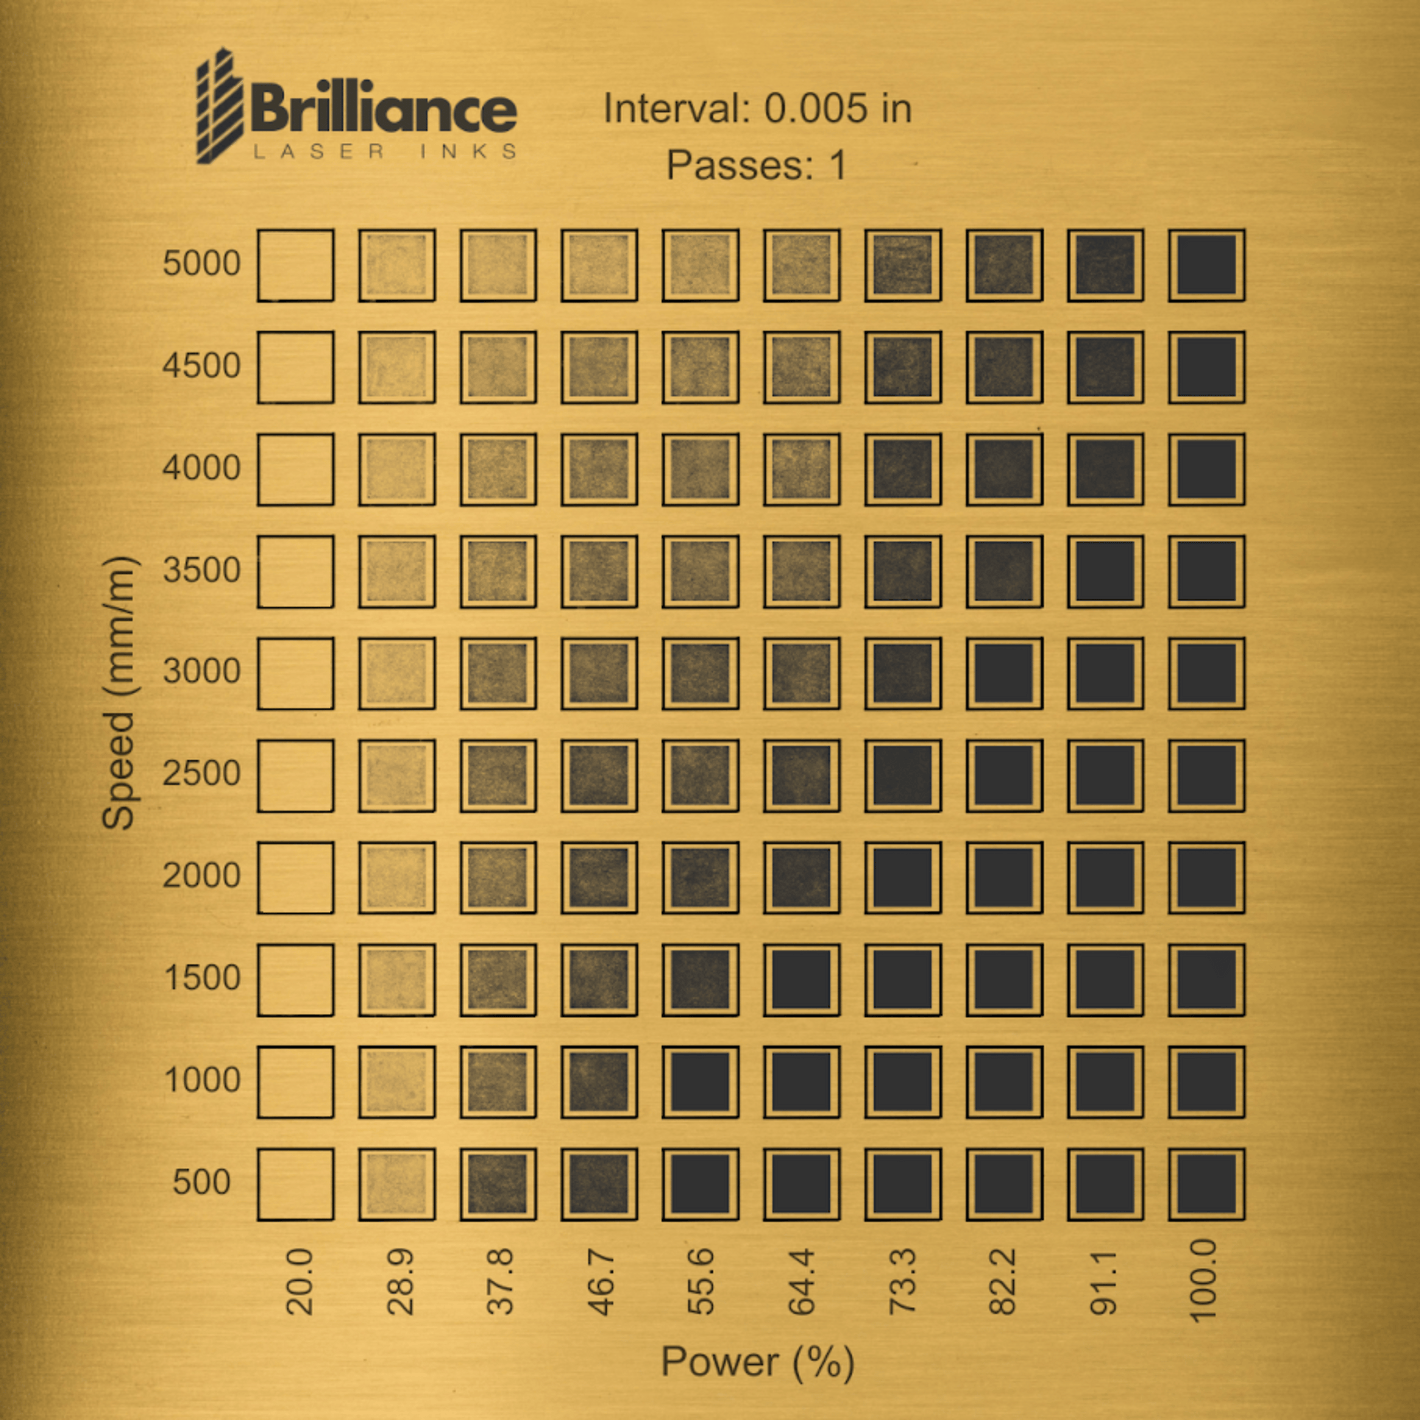
Brass
- Laser Ink: Universal Black Metal (BLI101)
- Variety: Aerosols, Powders, & liquid-ready
- Laser: 40 Watt Creality Diode Laser
- Materials: Brass.
Note: These are just general guidelines, and settings may vary depending on the laser you are using and the substrate you have for marking.
-
Aluminum
- Laser Ink: Black Aluminum (BLI404)
- Variety: Aerosols & Powders
- Laser: 40 Watt Creality Diode Laser
- Materials: Aluminum.
Note: These are just general guidelines, and settings may vary depending on the laser you are using and the substrate you have for marking.
-

Ceramics
- Laser Ink: Ceramic and Glass Black Marking Spray (BLI420)
- Laser: 40 Watt Creality Diode Laser
- Materials: Ceramics
Note: These are just general guidelines, and settings may vary depending on the laser you are using and the substrate you have for marking.
-

Glass
- Laser Ink: Ceramic and Glass Black Marking Spray (BLI420)
- Laser: 40 Watt Creality Diode Laser
- Materials: Glass.
Note: These are just general guidelines, and settings may vary depending on the laser you are using and the substrate you have for marking.


How to apply Aerosols
-

1. Clean the Surface
- Start by cleaning the material surface with alcohol to remove any dirt or oils.
- Make sure the surface is completely dry before proceeding.
-

2. Apply the Spray
- Shake the bottle well before using to ensure all the contents are properly mixed.
- Hold the bottle at a 45° angle, about 6-8 inches away from the surface.
- Use a left-to-right motion to apply an even, thin coat. Apply just enough until the surface is no longer see-through.
-

3. Laser Settings
- Adjust your laser settings based on the material you’re working with.
- Please click here for general recommended settings.
- Adjust your laser settings based on the material you’re working with.
-

4. Removing the residue
- There’s no waiting time required! Once you're done lasering, rinse the surface under tap water or simply wipe it with a wet cloth. That’s it—enjoy your permanent, high-quality mark on your finished product!


Disclaimer for Using Brilliance Laser Inks with Diode
When using Brilliance Laser Inks with diode lasers on metals, ceramic, and glass, it is crucial to adhere to safety precautions and best practices. Below are critical guidelines and potential risks to be aware of during this process:
Safety Precautions
- Protective Gear: Always wear safety goggles and heat-resistant gloves to protect against laser exposure and potential burns.
- Ventilation: Ensure that your workspace is well-ventilated to minimize inhalation of fumes produced during the laser engraving process.
- Training: Only trained operators should handle the equipment to prevent accidents and ensure proper use.
Best Practices
1. Cleaning Optics and Lenses:
- Regularly clean optics and lenses to maintain a clear laser path and prevent distortions in laser output.
2. Calibrating Settings:
- Calibrate your laser settings for various materials. Adjust power, speed, and frequency according to the manufacturer's guidelines to achieve optimal results.
3. Knowing Laser Power:
- Be aware of your laser power capacity. Excessive energy can damage both the material and the equipment.
4. Material Thickness:
- Ensure materials, such as metal, are of appropriate thickness. Using materials that are too thin may lead to breakage or failure to achieve desired results.
5. Testing on Sample Materials:
- Conduct tests on sample materials before starting full-scale projects. This helps fine-tune settings and achieve desired outcomes with minimal wastage.
Operational Guidelines
1. Manufacturer Guidelines:
- Follow all instructions provided by the manufacturers of both the laser equipment and Brilliance Laser Inks to ensure smooth operation and prolong equipment lifespan.
2. Regular Maintenance:
- Perform regular maintenance checks on your laser equipment to identify wear-and-tear issues promptly and avoid unexpected breakdowns.
3. Risk Awareness:
- Be aware of potential risks, including material cracking, incomplete engraving, or unexpected material reactions.
Resources and Key Points
1. Common Diode Laser Issues & How To Troubleshoot Them
- Guide Overview: Comprehensive troubleshooting guide for diode laser engravers.
- Key Tips:
- Check laser alignment and focus.
- Ensure proper material placement.
- Adjust power settings for different materials.
- Watch here Common Diode Laser Issues & How to Troubleshoot Them
2. Advice for Engraving Ceramic
- Guide Overview: Discussion on challenges and methods for engraving ceramics.
- Key Tips:
- Consider alternative methods like sublimation for certain ceramics.
- Use appropriate laser settings for different ceramic types.
- Read more HERE
3. Comprehensive Guide to Laser Engraving and Troubleshooting
- Guide Overview: Addresses common laser engraving issues and solutions.
- Key Tips:
- Move the laser beam to prevent overheating.
- Adjust speed and power settings to avoid burning.
- Regularly clean and maintain the laser equipment.
- Read more HERE
FAQ's
Is BLI products compatible with a 5-watt diode laser?
Is BLI products compatible with a 5-watt diode laser?
No, a minimum of a 10-watt diode laser is required for marking ceramics and glass, stainless steel or similar metals, while marking aluminum requires at least a 20-watt diode laser.
Are diode lasers capable of marking all materials when used with Brilliance Laser Inks?
Are diode lasers capable of marking all materials when used with Brilliance Laser Inks?
Diode lasers can mark a variety of materials, including metals, ceramics, and glass, but the power level and type of Brilliance Laser Ink used must match the material's properties.
Is the spray compatible with the infrared laser on the xTool F1?
Is the spray compatible with the infrared laser on the xTool F1?
Infrared lasers, like the one in the xTool F1, are not ideal for marking materials with Brilliance Laser Inks due to their specific wavelength and how it interacts with the inks. Infrared lasers operate in a wavelength range that is less effective at directly bonding or reacting with the chemical composition of Brilliance Laser Inks. These inks are typically designed to work with lasers that generate sufficient energy absorption in the visible or near-infrared spectrum, such as CO2 or fiber lasers.The key limitations include:
- Energy Absorption: Infrared lasers don't generate enough absorption on the surface when combined with Brilliance Laser Inks. This limits the thermal reaction needed to create permanent marks.
- Material-Specific Compatibility: Brilliance Laser Inks are formulated to work on certain substrates with specific wavelengths. Infrared laser beams may pass through or fail to adequately heat the ink layer, disrupting its effectiveness.
- Marking Precision: Infrared lasers provide precision for specific metals or other opaque materials, but when used with these inks, their wavelength fails to generate the necessary interaction, resulting in inconsistent or no marking at all.
For optimal results, you would need to pair Brilliance Laser Inks with a laser type suited to their formulation, ensuring proper energy absorption and chemical bonding. Always verify compatibility before starting a project.
Is it possible to engrave 1mm aluminum using a diode laser and Universal Black Metal Spray?
Is it possible to engrave 1mm aluminum using a diode laser and Universal Black Metal Spray?
Yes, it is possible to engrave 1mm aluminum using a diode laser and Universal Black Metal Spray, but it requires proper technique and sufficient power from the laser. Diode lasers generally need at least 20 watts of power to effectively mark aluminum, as it is a highly reflective and thermally conductive material. The Universal Black Metal Spray plays a crucial role by enhancing the laser's effectiveness, as it creates a coating that absorbs the laser's energy more efficiently.
Please click this link to know more about Black Aluminum Metal Marking Ink.
Is it possible to engrave ceramics and glass using a diode laser?
Is it possible to engrave ceramics and glass using a diode laser?
Yes, it is possible, but you will need a diode laser with a minimum power of 10 watts to achieve optimal results.
Can I use my 10-watts diode laser to engrave on silver or gold?
Can I use my 10-watts diode laser to engrave on silver or gold?
The short answer is NO.
Laser marking inks work based on two principles:
1. Activation: A CO2 laser with a wavelength of around 10,000 nm triggers the ink, turning it black.
2. High Temperature: The substrate must reach a high peak temperature to chemically bond with the ink.
Soft metals like aluminum, brass, copper, silver, and gold are excellent heat conductors. This makes it harder to achieve and maintain the high temperatures they need for marking, especially if the metal is thin. Precious metals like silver and gold are also inert, meaning they don’t react easily.
We do not officially recommend using our inks on silver due to its high purity and heat dissipation properties. However, some customers have had success with Sterling Silver of lower purity (e.g., 925 silver, which is 92.5% silver and alloyed with metals like copper). Thin materials, in particular, make it challenging to maintain peak heat for bonding.
When using a 30-watt laser, the power may not be sufficient for metals like silver or brass. If you want to try, start with maximum power and a very slow speed (1% for silver or brass), then gradually adjust the speed once you see consistent results. For stainless steel, use maximum power with a speed of 5-10%, adjusting as needed. Keep DPI between 350-500 and ensure the image has high resolution.
For best results, maintain optimal machine performance. Check your laser optics and ensure precise focus, as older machines may not deliver full power. Higher-powered machines (60-100 watts) work better for metals like silver and brass.
For further guidance, consult our settings table, or contact us directly.
Can I use my 10W diode laser with Red (copper tone) metal marking ink to engrave or mark stainless steel?
Can I use my 10W diode laser with Red (copper tone) metal marking ink to engrave or mark stainless steel?
Yes, it should work with red (copper tone) on stainless steel, as long as the metal surface is uncoated or not anodized.
I used the universal Black Metal Laser Marking Inks on glass with my F1 Ultra (20W Fiber Laser + 20W Diode Laser), but it didn’t make a difference. Any tips on what I should try next?
I used the universal Black Metal Laser Marking Inks on glass with my F1 Ultra (20W Fiber Laser + 20W Diode Laser), but it didn’t make a difference. Any tips on what I should try next?
Our Universal Black Metal Laser Marking Ink is specifically designed for use on bare metals. For optimal results on glass surfaces, we recommend trying our newly launched Ceramics and Glass Black Laser Marking Ink.
Click this link to learn more about the Ceramics and Glass Black Laser Marking Ink.
How should I prepare the material surface before using a diode laser with Brilliance Laser Inks?
How should I prepare the material surface before using a diode laser with Brilliance Laser Inks?
Ensure the material surface is clean, dry, and free from grease, oil, or debris. This helps the ink adhere properly and ensures precise marking results.
What settings should I use on my diode laser for optimal results with Brilliance Laser Inks?
What settings should I use on my diode laser for optimal results with Brilliance Laser Inks?
The laser power, speed, and passes depend on the material and inks. Higher power is typically required for harder materials like aluminum, along with slower speeds for better depth and quality.
Please click this link for general suggested settings.
Why is my diode laser not achieving a clear mark when using Brilliance Laser Inks?
Why is my diode laser not achieving a clear mark when using Brilliance Laser Inks?
This could be due to insufficient laser power, incorrect speed settings, or improper application of the ink. Double-check your equipment setup and ensure the ink is fully dry before engraving.